About us

Recipes - Pages

Pages

Friday, July 31, 2015

Grain Free Breakfast Muffins


Remember when I made those fabulous  black bean brownies that everyone loved and no one knew they were made with black beans?  Well, this time I tried making muffins using chick peas! 

I know it sounds weird, but guess what? These grain free/gluten free breakfast muffins came out fabulous as well, and you will never know they were made with chick peas! 

Beans give baked goods lots of moisture and a substantial amount of protein. I don't know why, but you can't detect any bean taste in the baked goods.  Beans are a healthy choice for those who want or need to eliminate grains in their baking or for anyone who just wants to eat healthier !

Great For Breakfast

These luscious muffins are really fast and easy to make and versatile. You can try different nut butters ( peanut butter, almond butter, cashew butter, sunflower butter- they will all work)  and different flavor all- fruit jellies.  I used all fruit strawberry, but you could try all fruit blueberry, all fruit raspberry, all fruit grape, etc. These convenient muffins make a perfect breakfast grab and go that are high in protein and low in sugar! Make them in advance- they will keep for a few days or freeze them and pop them out as needed.  

Don't want the jelly? Leave it out !It will be a less sweet muffin- but will still nice and nutritious for breakfast with a cup of herbal tea or coffee. 


Great for Snacks or School lunch Boxes

These muffins are a perfect idea for a high protein snack or even added to the school lunchbox for kids. I made mini muffins so little ones could eat just one or as many as they like. I think the muffins taste best when they are small. 

When you pack them into a school lunches,  these muffins are similar to making a peanut butter and jelly sandwich but in a muffin. They provide significant protein, healthy fat, substantial fiber, and other nutrients. They are kid tested by my grandkids and they love them!

If you are concerned about packing nut butter to school, substitute Sunbutter which is made from sunflower seeds, not nuts. 

SunButter is available in most health food stores or can be purchased online.
SunButter Natural Sunflower Seed Spread, 16-Ounce Plastic Jars (Pack of 6) 


Chick pea muffins are a great after school snack to have on hand or can be packed in baggies to bring along when traveling in a car, train, or airplane. 
Going to mall?  Pack some along for the kids for a nutritious snack. 
  

Author: Judee Algazi from Gluten Free A-Z Blog
Prep Time: 8 minutes 
Bake Time: 10-12  minutes oven time per 12 mini muffins
Preheat Oven: 400 degrees


Ingredients ; 
2 cups cooked chickpeas, drained ( canned works)
1/2 cup of any nut butter or try Sun butter 
1 ripe banana, sliced
2  eggs, beaten
1 teaspoon of organic vanilla extract
2 tablespoons of organic coconut crystals or use raw honey
1/4 teaspoon baking powder ( aluminum free)
1/2 cup of all fruit jelly ( any flavor) 

Directions:
Put the drained chick peas, nut butter, banana, eggs, vanilla, coconut crystals, baking powder into a powerful blender ( Vitamix or Bullet) . Blend well. Grease a mini muffin pan for 12 and fill with 3/4 batter. Spoon in a 1/2 teaspoon of the all fruit jelly into the middle. Bake for 10-12 minutes.

*coconut crystals - I buy mine at Trader Joe's, Whole Foods,  or any health food store; coconut sugar is low in carbohydrates and also low on the glycemic index. They work great for baking as a sugar substitute. 


buy at Trader Joe's, Whole Food, or any health food store
Wan't to add chocolate chips?  I get dairy free chocolate chips in Shoprite supermarket in NJ and Pa or order online !Enjoy Life Semi-Sweet Chocolate Chips, Gluten, Dairy, nut & Soy Free, Mini Chips, 10-Ounce Bags (Pack of 6) 


Another healthy gluten free/dairy free/ egg free snack:   


Creamy chocolate pudding made with creamy avocado. 
Whip it up in just 5 minutes in your blender!
chocolate pudding made with avocado
Best and healthiest chocolate pudding ever is DF GF Egg Free

This post will  be shared on  
My blog carnival list


I am an affiliate for Amazon , and I do receive a small compensation if you purchase an item on Amazon by clicking through my blog. I do appreciate the support because it helps cover the expenses of running the blog.


Food is my passion. I am gluten intolerant, busy. and strive for a healthy balanced lifestyle. It has taken me many years to come up with easy healthy recipes that meet gluten free, vegetarian and real food standards. On my blog I share my journey, my struggles, my discoveries, and my new recipes. I hope you find ideas, resources, and recipes that will be helpful to you. Come Back soon.


Thursday, July 30, 2015

GF Buttery Almond Shortbread Cookies


If you like the taste of almonds, you will adore these fast and easy shortbread cookies. There are only 5 healthy ingredients in this recipe, and the cookies bake rather quickly. You could whip up a batch on short notice from start to finish in just 25 minutes.

Years ago I took a trip to Scotland. I brought home only 2 souvenirs: a beautiful red and black plaid wool Scottish hat and a few tins of traditional delicious Scottish shortbread cookies.


My shortbread recipe is a little different than the authentic recipe because my recipe is grain free and gluten free, yet my allergy friendly buttery version still is reminiscent of the cookies I ate in Scotland!

Are you vegan? Shortbread contains no eggs, so it's easy to substitute oil for the butter to make this recipe vegan.

My grandkids ( ages 4 and 7) love to bake when they come to visit. I try to find recipes that will satisfy their palate as well as their short attention spans. The 4 year old expects to eat her cookies almost immediately, so 12- 15 minutes in the oven is perfect.

These delicious cookies will please not only the kids, but also the most discerning adults. My recipe is a basic shortbread recipe with all the flavor and richness of butter and Scotland!


Author: Judee Algazi- Gluten Free A-Z Blog
Prep Time: 5-7 minutes
Bake Time: 12-15 minutes at 350
Makes: 10 cookies


Ingredients:
2 cups almond meal/flour ( Trader Joe's)
6 Tablespoons softened or melted organic butter ( or substitute olive oil)
4 Tablespoons coconut sugar ** see my notes below ( or any sugar of your choice)
3/4 teaspoon of organic almond extract
1/4 cup almond milk ( refrigerator case - supermarket)

Directions:

Preheat oven to 350
In a large mixing bowl, mix together the almond flour and coconut sugar. Combine the butter, almond milk and the extract and then mix into the almond mixture using a large spoon. Mix until everything is combined and then drop by the tablespoon onto a greased parchment covered cookie sheet ( grease the parchment). Flatten cookies with a fork and bake for 12-15 minutes depending on your oven. After 10 minutes of baking, check the cookies frequently andRemove from oven when the bottoms brown. Cool on a rack for 10 minutes.


My Notes: 
Coconut sugar is a lower glycemic sugar that is available at Whole Foods, Trader Joe's and most health food stores. It is lower in carbohydrates than traditional sugar and considered somewhat  healthier because it is coconut sap and has some nutrients. Personally, I would still use it in moderation.

Almond meal/flour- you can make your own by grinding almonds or it is available by the bag at Trader Joe's for a reasonable price or most health food stores.


I will be sharing this post on  

The blog carnivals 

on my blog carnival list

Connect with me and I'll connect with you!


Pin It Please leave a comment so I know you stopped by. Scroll down to the end of the post and click on comments.

Saturday, July 25, 2015

Cauliflower Crusted Mini Pizzas


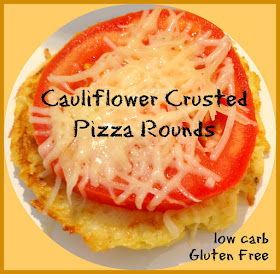
individual sized pizza round topped with a slice of tomato and cheese

Low carb individual sized gluten free mini pizza crusts are great to eat for a healthy lunch, dinner, or snacks. Once you get the hang of ricing cauliflower in your food processor ( very easy in 5 minutes) , this recipe is a cinch! Cauliflower is a low carb yet nutrient rich vegetable that you can substitute for grain in most recipes and it tastes great this way.

 I can make these mini pizza crusts without using any flour. That means I can eat not only a healthier crust but also eliminate the high carbohydrate content of regular dough .
That works for me!

The recipe makes 12 mini pizza crusts. I calculate that each crust is just 1 Point Plus on WW+ the topping. Yes,- I'm back counting points on Weight Watchers after a long time partying! I put on some weight, struggling with my clothes, and realize it's time for me to start counting those points again and eating more consciously.

 I need to start my day with a food plan. It's just that simple- otherwise the little kid in me can make some very poor choices.

 Cauliflower pizza crusts fit into a healthy diet plan. They can be topped any way you like them.
 They are gluten free and grain free.

These are some of the toppings I've used for my mini pizza crusts :
  • Marinara sauce, shredded cheese, mushrooms
  • Chopped summer tomato, red onion, chopped cucumber
  • Large slice of tomato covered in shredded cheese and a basil leaf
There is no limit to your creativity when it comes to toppings- top the crusts with whatever you like!


Author:      Judee Algazi
Prep Time: 10-15 minutes
Bake Time: 15 minutes + 5 minutes again
Equipment: Food Processor
Preheat Oven: 450 degrees
Makes : 12 mini pizza crusts

Ingredients: 

1 head of cauliflower chopped ( then riced in the food processor- see below)
2 large eggs, beaten
1 cup of shredded mozzarella cheese
1/2 cup freshly grated Parmesan cheese
Freshly cracked pepper to taste
optional: add garlic powder is desired

Directions:

Preheat oven to 450 degrees

How to rice your cauliflower : 
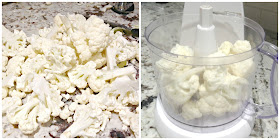
Place 1/2 of the cut up cauliflower in a food processor using the metal blade. Whiz a 2-3 times very quickly ( on off , on off, on off) until the cauliflower resembles rice. Remove from the processor and place in a large mixing bowl. Repeat with the other half of the cauliflower.

Cook Your Cauliflower whether you make your own or buy it in a bag 
Place the riced cauliflower in a large skillet  that has been sprayed with olive oil, and cook on med high for 3-5 minutes, stirring frequently so it doesn't burn. Taste cauliflower to see if it is cooked but not overcooked. Remove from heat and return to the mixing bowl. Add the eggs, shredded mozzarella cheese, salt and pepper and mix well with a spoon.

Bake Your Pizza Crusts: 
Cover two cookie sheets with parchment paper. Spray well with cooking oil spray.
Using a 1/4 cup measuring cup, scoop out 12 scoops onto the cookie sheets .
Flatten each scoop with the palm of your hand to make a small round circle.
Place in oven (450 degrees) for 15 minutes until the pizza crusts begin to brown.

Remove from oven. Place toppings on Pizza crusts and put back in the oven for 5 more minutes.

Or ** Remove from oven, allow to cool, and save for later. Top and heat just before you would like to eat them.


snow white chopped cauliflower and food processor


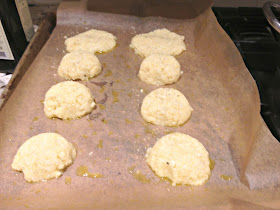
mounds of cauliflower on parchment papper
Scoop 1/4 cup of the cauliflower and egg mixture into mounds onto cookie sheets

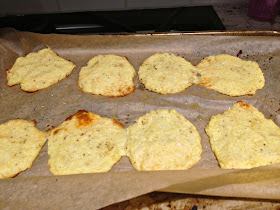
end result of 8 mini pizza crusts after baking
Flatten with palm of hand and bake for 15 minutes


My Notes: 
1. If you don't want to or can't use a food processor, you can grate the cauliflower with a hand grater. It will be more time consuming. 

2.  Prepare and bake the crusts in advance for the 15 minutes and then top them and bake again for 5-10 minutes before eating

3. My parchment paper is brown because I use an all natural parchment that has not been chlorinated.

4. These pizza crusts are not as crunchy as a non grain crust, but still really work well. Try my plantain pizza crust for a crispy crust


Will be linking this post to my
My blog carnival list


Blog Author: Judee Algazi
Pin It Please leave a comment so I know you stopped by. Scroll down to the end of the post and click on comments.


Tuesday, July 21, 2015

Hearty Corn Chowder


Yes, I'm making soup again. Yes, I know it's summer, but it's also corn season and all the local farms are bursting with fresh corn on the cob. AND fresh corn from the cob and little chunks of red potatoes make a fabulously flavorful chowder. 

Personally, I love soup no matter what the season, even during this brutal heat wave! However, I did make it late at night so not to heat up the kitchen.

This hearty delicious soup is easy and quick to make and contains no dairy or added thickeners. The potatoes become creamy as they cook and the corn releases it's own starch giving the soup the consistency of a thick chowder.

I'm usually not a big corn lover, but there is something about fresh corn on the cob from the local farms that calls my name. I do love eating the crunchy kernels raw right off the cob, and I do love adding the fresh sweet uncooked kernels to soup and salads.

I buy my corn at a local farm that grows Non GMO corn- believe me that's hard to find, so I'm taking advantage of it. I may even freeze some ears for the fall.

It's a hard to tell from the photo, but the soup also has chunks of red peppers and sautéed onions. 

If you are not a summer soup lover, why not pin the recipe right now to make in the fall ( yes, you could use frozen corn)

OtherRecipes for Fresh Corn : 

My favorite way to eat corn is cut raw off the cob and add it to a salad. My Tomato and Corn summer salad is delicious.

You could also add fresh corn to my easy Egg Drop soup  or 
my Asian Quinoa Slaw Salad when fresh corn is in season

Another popular corn recipe is my Pot luck Corn and Bean Bake


Author: Judee Algazi
Prep Time: 10 minutes
Cook Time: 25 minutes


Ingredients: 

4 ears of fresh ( non- gmo) corn on the cob ( about 3 cups of corn) 
5 cups of vegetable broth
2 cups of water or corn broth 
2 Tablespoons olive oil 
1 and 1/4 cups chopped onion
1 large red potato, chopped
1 cup of chopped red pepper
Fresh cracked pepper to taste

How to make corn broth
After you cut the corn off the cob, place the cobs in a saucepan and cover with water ( just to the top of the corn) Bring to a boil and then allow to simmer covered for about 15 minutes. Turn off the heat and allow to sit for another 10 minutes covered before using. Strain and use. 

Directions for the chowder

Using a large knife, cut the corn kernels off the uncooked corn cob and set aside. Heat the oil in a large soup pan. Add the onion and sauté until the onion begins to soften. Add the potatoes, red pepper, corn and continue to saute and stir for about 5 minutes, coating all the veggies. 
Add the 2 cups of corn broth and 4 cups of vegetable broth ( or 6 cups of vegetable broth)  to the sautéed vegetables and allow to cook uncovered for about 15 minutes until the potatoes are very soft and crumbly. Cover and simmer for about 5-10 more minutes. ( If the liquid cooked down- add 1 cup of additional broth or water) 

My Notes : 

  • When I want a thinner soup, I add more broth or water especially the next day.
  • I love the idea of making my own corn broth from the cobs, but it does require a little more time. Make your broth the day before or just use all vegetable broth in the recipe if you are in a hurry. 


I Will Be Linking this recipe to my Blog Carnival List 

Pin It Please leave a comment so I know you stopped by. Scroll down to the end of the post and click on comments.

Saturday, July 18, 2015

Cucumber Avocado Detox Soup


This is an interesting chilled soup that acts as a detox,  tastes great, and is healthy too.
Summer is a great time to detox, and this delightful chilled cucumber avocado soup is a delicious way to do it. The simple soup contains specific healthy ingredients that can help increase your body's alkalinity and help eliminate toxins that may clog your liver.

The soup is very easy to make and is refreshing! The Avocado makes it creamy, the cucumber makes it light, the red onion gives it flavor, the lemon and apple cider vinegar make it a slightly tangy and cayenne gives it a little kick!

It serves as a quick snack or a mid afternoon pick me up after a day's work. The nutrients and healthy fats are energizing, and it only takes 5 minutes to prepare from start to finish.

Personally, I sometimes leave out the cayenne and drink it for breakfast like a green smoothie.
If I want even more greens, I add a leaf of kale or spinach!


Mild, cooling, and delicious, this vegan and gluten free soup is a welcome treat on hot summer's day!I make the recipe for myself in advance as a snack, pick me up, or breakfast smoothie.
If you would like to make it for 2-4 people, the recipe multiplies well

My notes: Although you can drink it immediately after whirling it in the high speed blender , it really tastes best when it's been chilled for a few hours. It also holds up great overnight in the refrigerator so you can make it in advance for guests! Yes, Chill It!

Author: Judee Algazi
Prep Time: 5-7 minutes
Cook Time: 0 minutes
Serves 1- multiply by 4 if desired

Ingredients: 

 2 Persian or Kirby type organic cucumbers ( if not organic peel off skin), sliced
1 teaspoon of chopped red onion
1/4 avocado, peeled
1/4 cup of chopped organic parsley
1/4 cup of chopped cilantro
1 Tablespoon freshly squeezed lemon ( or lime) juice
1/8 teaspoon of pink Himalayan Sea Salt
1 cup of water
Optional: 1/4 tsp chili powder or cayenne pepper


Directions:
Using a Nutribullet, Vitamix, or blender, add all the ingredients and whiz until well blended.
Remove and drink or chill for later.
Garnish with sliced cucumber or mint sprig.


green chilled cucumber soup in a bowl
Chilled Delicious Cucumber Avocado Detox Soup


                              This post will be shared and linked on 

My blog carnival list


______________________________________________________

Pin It Please leave a comment so I know you stopped by. Scroll down to the end of the post and click on comments.

Sunday, July 12, 2015

Egg Drop Soup - Weight Watcher Style


bowl of vegetarian egg drop soup


Have you ever made homemade egg drop soup? I never did until I found this recipe on  Marilyn's Treats

After making my (adapted version of) Marilyn's recipe, all I have to say is it was - Fast, Easy, and Delicious! 

I served a piping hot bowl to my husband, and he raved about it. He felt it was comparable to soup he eats in the Chinese restaurants. I was surprised because although the soup looked just like restaurant style egg-drop soup,  I knew that this recipe was the Weight Watchers style version and was much lower in calories and fat than the restaurant style egg drop soup.  This recipe does not call for cornstarch or added oils.

The recipe only has 3 ingredients, takes 5 minutes to make, and is really good!
If you want a soup to warm you up on a cool fall or a cold winter night, Pin the recipe for later!

If you are like me and enjoy a good bowl of hot nourishing soup no matter what the season, then make it now and enjoy.

I'm always on the look out for a fast and easy delicious soup. It doesn't get faster or easier than this homemade Chinese Egg Drop Soup. It's made from start to finish in just 5 minutes and the flavor is a match for your favorite Chinese restaurant, but less salty.

It's a simple 3 ingredient soup but packs a lot of punch.

The real plus of this soup recipe is that it is low in calories-
It is just 1 points plus on Weight Watchers.
You can make it to begin a meal and not have to feel guilty.

I have to admit that before I found this recipe, I had never imagined making my own egg drop soup. I have no experience cooking Chinese food. This was really easy. Thanks Marilyn.

As always my recipes are gluten free and vegetarian

How to make the Weight Watcher's style version


Adapted from : Marilyn's Treats
Prep Time: 5 minutes
Cook Time: 5 minutes


Ingredients

4 cups of vegetable broth ( choose one that tastes good)
1/2 cup scallions, sliced thin
optional: 1/4 teaspoon ginger powder
1 egg, beaten lightly

Instructions: 
Bring vegetable broth to a boil in a saucepan. Add green onion and ginger powder.
Remove the saucepan from the heat and drizzle the beaten egg slowly into the pan.
Stir and allow to sit for one minute for the egg to finish cooking and then ladle into bowls


vegetarian egg drop soup in a bowl

bowl of vegetarian egg drop soup and scallions chopped up


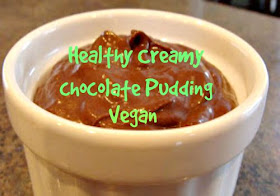
Need a fast healthy dessert that you can make in 5 minutes?

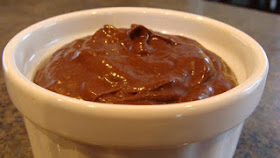
white ramekin filled with chocolate pudding
Chocolate Pudding Recipe ( Make in 5 minutes)


This Recipe will be linked to 

My blog carnival list


If you are new to my blog and would like to be notified when I post a new recipe, please enter your email. Don't miss a recipe - about one or two a week.  ( you can unsubscribe at any time) subscribe by going over to the right side column and look for subscribe by email.

I am an affiliate for Amazon and I do receive a very small compensation if you purchase on Amazon by clicking through my blog. I do appreciate the support that helps cover the expenses of running the blog.


Healthy Food is my passion. I am gluten intolerant, busy. and strive for a healthy balanced lifestyle. It has taken me many years to develop and discover easy healthy recipes that meet gluten free, vegetarian/vegan and real food standards. On my blog I share my journey, my struggles, my discoveries, and my new recipes. I hope you find ideas, resources, and recipes that will be helpful to you. Come Back soon.
Pin It Please leave a comment so I know you stopped by. Scroll down to the end of the post and click on comments.

Friday, July 10, 2015

Grow Scallions in Water


Growing the ends of used scallions in water on your windowsill is similar to growing your own fresh herbs but easier ; I saw this ridiculously easy idea on Pinterest, and it works! 

You can grow a continuos supply of green onions right on your windowsill starting with the 99 cent bunch of scallions that you buy in the supermarket.

They don't even need soil to grow; They will grow in water in a small glass!

You know the white ends of the scallion with all the roots? ( the part you probably throw away?) After you use your the green part of the scallion, don't throw away the white ends. Those little suckers will grow a whole new scallion, and the scallion will grow quickly like in a week!


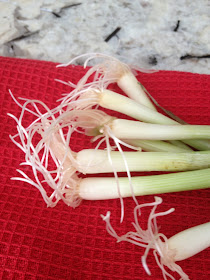
scallion white ends with roots
white ends after they were in water for a week


I saw the idea a long time ago, but it wasn't until last week that I thought I'd give it a try. Within one week, I have an entire bunch of scallions all over again. Yes, that quickly. Who knew?


Don't store scallions in your refrigerator

Even if you do not want to grow your own continuous supply of scallions, this method is also a way to just keep your scallions fresh. Store your scallion in some fresh water just like flowers! How many times to your find that the scallions you purchased last week went bad in the refrigerator? 

Have you ever done this before? Talk about frugal. You get all the scallions you want from one bunch. After a month or two it may get funky (change the water often), so throw away and just start with a new bunch!!


How to Grow Scallions on Your Windowsill

Materials Needed: 
A glass jar
Water

Directions

1. Wash your scallions well and use as much of the green part as you like.
2. Place the white ends with all the roots in a small glass after you have cut some of all of the green part off. Cover the white ends with filtered water.
3. Place on your counter, windowsill, deck, or patio.
4. Change the water every 3 days. ( I like to keep mine on my counter, so I remember to change the water)
5. It begins to grow immediately. Within a week, you will have tall green shoots that you can use for your cooking. They will just keep growing and growing!


green scallions growing out of a jar of water

Have you tried this before? What do you think? 

I love your feedback, so please leave a comment. 


Do you like my recipes? If you are new to my blog and would like to be notified when I post a new recipe, please enter your email in the top right hand corner of my blog.  ( you can unsubscribe at any time) subscribe by going over to the right side column and look for subscribe by email.

Just so you know: I am an affiliate for Amazon and I do receive a very small compensation if you purchase on Amazon through my blog. I appreciate the support to help cover the expenses of running the blog.


Food is my passion. I am gluten intolerant, busy. and strive for a healthy balanced lifestyle. It has taken me many years to come up with easy healthy recipes that meet gluten free, vegetarian and real food standards. On my blog I share my journey, my struggles, my discoveries, and my new recipes. I hope you find ideas, resources, and recipes that will be helpful to you. Come Back soon.


Pin It Please leave a comment so I know you stopped by. Scroll down to the end of the post and click on comments.

Sunday, July 5, 2015

Asian Quinoa Slaw Salad


This festive Asian Quinoa Slaw will make a beautiful presentation at any get together. It's a colorful healthy recipe that includes shredded red cabbage, shredded carrots, crunchy pecans, raw sunflower seeds, sesame seeds and chopped green scallions and is mixed with a generous portion of flavorful tricolored quinoa and a delicious Asian dressing.

The healthy salad is perfect for any vegetarian, gluten free, or vegan guests, while the meat eaters will enjoy this salad as a complementary side dish.