Sunday, June 28, 2015

Beet Kvass - Probiotic and Liver Cleanser


Bowl of organic red beets

Beet Kvass is a popular fermented beet drink that is a blood purifier, liver cleanser, probiotic and a nutrition booster that can be made rather easily on your kitchen countertop in a 1/2 gallon Mason jar! Although it's becoming popular now, I recently found out that my Eastern European grandparents thrived on this drink! My paternal grandmother from Russia lived to be a healthy 107.

You use 3 simple ingredients: beets, sea salt, and whey ( vegans can omit and follow the recommended substitution suggested in the ingredients ) 

You simply soak cut of raw beets, some sea salt and some whey-let it sit to ferment for 2 days and then refrigerate. A half gallon of kvass lasts a long time (at least 2 weeks )  in the refrigerator.

What is whey? Whey is the clear liquid that you can separates in the yogurt and you can make your own whey very easily. Don't leave me yet, read the rest- you will be glad you did!


If nothing else, everyone needs a good source of probiotics to establish and maintain a healthy digestive system that digests your food properly, allows your body to absorb nutrients better, and keep the healthy bacteria thriving in your gut.

Kvass is good for you and what ails you ! I try to drink some daily. Can you buy kvass already made? I've never seen it.  But probably- but it is so so so easy to make, I think most people make their own.

How I was introduced to kvass


The first time I ever heard of beet kvass was at my friend Laura's house. Laura bought the book Nourishing Traditions, a book that serves as a manual for homesteaders who are returning to the earth and eating and living in harmony with nature. The recipe for kvass is in the book ( similar recipes are all over Pinterest)  and Laura makes it regularly to add valuable probiotics to her diet and help nourish herself and her family. Kvass is an all natural fermented probiotic product .

When Laura first introduced me kvass ( about a year ago),  I was amazed that she had actually fermented the concoction herself on her kitchen counter. I hesitantly tasted some of hers, very politely smiled, but couldn't fathom that I would ever ever ever make it. It seemed so mysterious, weird, and foreign.

However, a year later, I visited Laura at a time that I was not feeling well. I was nutritionally, physically, mentally and emotionally exhausted and run down. Laura was alarmed by my weakened condition and insisted  that I drink some of her homemade Kvass on the spot.

At that point, I gladly welcomed the nutrient rich easy to digest drink. It was like drinking a shot of pure magic energy. I felt an immediate benefit. Laura gave me a quart of her precious drink to take home, but not before she taught me how to more for myself.

For the next four days, I drank some of Laura's Kvass on an empty stomach twice a day. Truly, the effects were powerful.  My energy returned quickly, and I felt good enough to make my own new batch of kvass two days later.

Kvass is very easy to make

It only takes 5- 7 minutes of prep to prepare the kvass, but then it takes 48 hours for the finished product to sit covered on my counter to ferment. After the two days, the end product is a beautiful jar of rich red beet elixer. ( I know we are not used to leaving things out on the counter without refrigeration-but that is how things like sauerkraut, pickled vegetables, yogurt etc. ferments) Fermented food is a very important part of healthy eating.

Kvass is beneficial to drink every day. It is a liver cleanser, energy booster, and powerhouse of nourishment. It's good to know how to make health giving fermented food for yourself and your  family. It is naturally gluten free, vegan, and nut free.

How to make Beet Kvass

Author: Judee Algazi
Prep Time: 5-7 minutes
Fermenting Time: 48 hours
Makes : 1/2 gallon

Materials Needed:
  • 1/2 gallon jar ( I used a 1/2 gallon Mason Jar)
  • Whey ( you have to make your own or skip it and double the salt) 
  • doubling the salt is too salty for me,
  • How to make whey from yogurt ( very very very easy- see below) 

Ingredients:
3-4 medium organic beets
1 tsp of sea salt
1/4 cup of whey ( or omit the whey and add an additional teaspoon of salt)
filtered or distilled water to fill the 1/2 gallon Mason jar almost to the top

Directions:
1.  Peel and cut the beets into large chunks ( if organic beets, I leave skin on)
2.  Place chunks into a clean 1/2 gallon Mason jar
3.  Add sea salt and whey. Add water to almost the top of the jar.
4.  Stir to mix and cover with a dish cloth and allow to sit on the counter ( outside of the fridge) for
48 hours.

After 48 hours, put the Mason jar lid on the jar and refrigerate. Laura says it will last weeks ( ok she said months) in the refrigerator. Just drink the juice. You can leave the beets in the jar and then discard or discard initially.


Organic red beets in a white bowl
These beautiful organic beets were from my CSA farm this week 

red chopped beets on a cutting board
I left the skin the beets on because they were organic

Chopped red beets in a mason jar
Immediately after assembling the ingredients in my 1/2 gallon Mason Jar. Before soaking for 48 hours

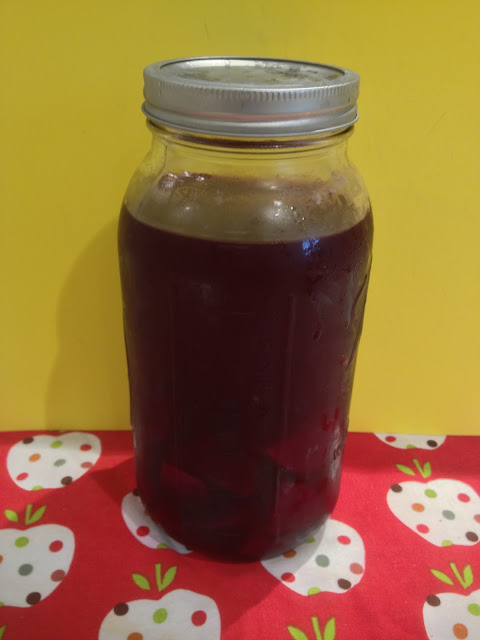
Beet Kvass in a large Mason Jar
Beet Kvass after fermenting for 2 days- rich red color


If you are vegan, skip the whey and add an extra teaspoon of salt It will be less salty if you use whey.

How to make Whey

Ingredients:
1 cup of plain yogurt
4 sheets ( layers)  of cheese cloth
1 qt size mason jar ( or any jar is ok)
1 clip or clothespin

small glass bowl of whey
This is whey ( the clear liquid separated from plain yogurt) 

Mason Jar with whey
This is how I separated the whey from the cup of yogurt
Directions: 
Using  a piece of cheesecloth about 4 layers thick ( you can cut what you want) - place a cup of plain yogurt in the middle of the cheese cloth  and pull all the sides up together. Place in a Mason ( or any) wide mouth jar and hang over night ( use the clip to hold it) can be left out overnight, does not need to be refrigerated for the first 12 hours while separating ( my husbands family has been making this safely for generations) - OH! the yogurt inside the cloth will turn into Lebnah or as it is known today -Greek yogurt- so enjoy using the whey and eating your yogurt spread.
refrigerate now or enjoy it warm.. yum!


Disclaimer: I am not a medical doctor and am not trying to diagnose or treat disease. The information in my blog is based sharing my own experiences for educational purposes only.
Always consult your medical doctor if you are not feeling well or before changing your diet in any way.


                                     This post will  be shared on  
My blog carnival list

Want to be added to My blog list? Let me know


Pin It Please leave a comment so I know you stopped by. Scroll down to the end of the post and click on comments.

Tuesday, June 23, 2015

Skinny "Potato" Salad Alternative


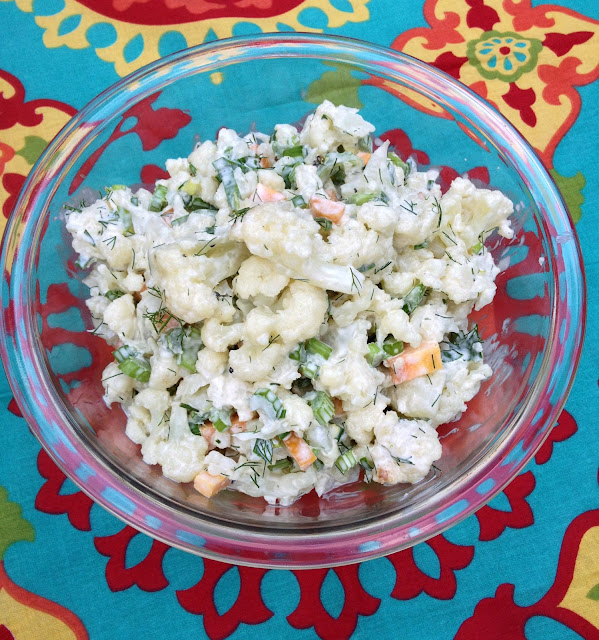
Bowl of potato like salad made from cauliflower


Got cauliflower? Make my homemade skinny potato salad alternative. 
Homemade potato salad is a special treat that most everyone loves, but despite how good it tastes some of us don't love eating all those carbs from the potatoes! With my skinnier version, you can cut the carbs way down by omitting the potatoes and substituting cooked cauliflower for the potatoes! It's genius!

The recipe tastes great, satisfies you yearning for potato-like salad, but is made with the great low carb impostor ( cauliflower) . Yes, once again cauliflower instead of starch like in my cauliflower crusted pizza, cauliflower breadsticks, cauliflower fried rice. ! This recipe can be ( and should be) made in advance, so it is a perfect to serve or bring to a BBQ. As with all of my recipes, it is gluten free and depending on the type of mayo you use, it can be vegan or vegetarian.

I love this recipe because it is packed with fiber from the diced raw veggies, packed a rainbow of health giving antioxidants, and lots of nutrients!

Variations:
  • Half red potatoes and half cauliflower 
  • All red potatoes- If you are not into the cauliflower and don't care about the carbs, you could still make this recipe as a strictly a delicious potato salad. 
  • All Cauliflower as the base- my way 

The uncooked diced vegetables add an interesting flavor and a nice crunch !

One large cauliflower makes a crowd size bowl! Looks like confetti! The picture below is about 1/3 of the recipe

**The secret is to allow the finished product to cool in the refrigerator for a minimum of 4 hours ( overnight is better) to allow the flavors to mingle and strengthen. 

glass bowl filled with cauliflower salad
This is 1/4 of the recipe 

Ingredients:
1 large cauliflower, washed and cut into medium chunk size flowerettes
1 cup of diced celery
1/2 cup diced organic carrot
1/2 cup of diced red pepper
1/2 cup of chopped scallions
1/4 cup of chopped fresh dill
1/2 cup frozen peas ( thawed for 10 minutes) ( I didn't have any)
1 cup of vegan or regular mayonnaise ( use light mayo if desired)
Salt and cracked pepper to taste
Optional: 2 chopped hard boiled eggs

Directions
Steam the chunks of cauliflower in a steamer basket until soft but not mushy
While the cauliflower is steaming, cut all of your vegetables
When the cauliflower is done, remove and set in a bowl to cool for 5 minutes
After 5 minutes, add the diced celery, carrot, red pepper, scallions, and frozen peas.
Mix in the mayonnaise and toss vegetables well.
Then add the fresh chopped dill and mix into the salad.
Add salt and pepper to taste.
optional: If you are a garlic fan- you can add some pressed garlic ( I didn't)
** place in the refrigerator for at least 4 hours or overnight to allow flavors to mingle.
Serve cold

My notes: If you want to cut the calories down even more, you could try using 1/2 cup light mayo and 1/2 cup Greek yogurt instead of the cup of mayo. ( test a small section with the Greek yogurt to see if you like it first- it makes it tangy and not as much like potato salad-it's different but good)
The cup of mayo covers about 10-12 servings cutting the fat content way down per serving.


white chopped cauliflower in a sauce pan


chopped veggies on a cutting board
proportions of chopped veggies in the photo may not be exact


Cauliflower and dill salad in a glass bowl
This is so good!


Skinny potato salad alternative in a bowl


This post will  be shared on 
 
My blog carnival list

Want to be added to My blog list? Let me know


Do you like my recipes? If you are new to my blog and would like to be notified when I post a new recipe, please enter your email in the top right hand corner of my blog.  ( you can unsubscribe at any time) subscribe by going over to the right side column and look for subscribe by email.

Just so you know: I am an affiliate for Amazon and I do receive a very small compensation if you purchase on Amazon through my blog. I appreciate the support to help cover the expenses of running the blog.


Food is my passion. I am gluten intolerant, busy. and strive for a healthy balanced lifestyle. It has taken me many years to come up with easy healthy recipes that meet gluten free, vegetarian and real food standards. On my blog I share my journey, my struggles, my discoveries, and my new recipes. I hope you find ideas, resources, and recipes that will be helpful to you. Come Back soon.


Author: Judee Algazi
Pin It Please leave a comment so I know you stopped by. Scroll down to the end of the post and click on comments.

Sunday, June 21, 2015

Tribute to My Dad on Father's Day + Potato Salad


Father's Day is a time to acknowledge dad and celebrate his awesomeness!

On Father's day in our family, our traditional family celebration is to bring all of the fathers and their families together for a BBQ.  Over the past few years, my daughter in law Wendy has been hosting! The list includes, my husband, my brother in laws,  and my sons, Wendy's father and step father and uncles as well as everyones spouses and children of course.

Despite the happy occasion, it still reminds us that some of our fathers are not with us; that includes my father. My dad has been gone for 29 years, but I still remember his devotion to our family and the many sacrifices he made for us! He was fun to be around, and he liked to cook. When I was little, he owned a deli where he made homemade potato salad to sell every day! I don't have his recipe, but at the end of the post I linked some of my favorite potato salad recipes.

My dad was called Al ( a more secular name than his birth name of Abraham and his childhood name of Abee) .
I called him Dad;  his grand kids called him Pop Pop, my mother called him honey.

Things I remember about my dad:

  • He made his own Italian spaghetti (sauce) gravy every Sunday for a spaghetti and meatball dinner.
  • He was the oldest of five : 2 brothers ( Hyman and Lou)  and 2 sisters ( Annabel and Ruth)
  • His parents were immigrants from Russia
  • His father ( Reuben)  died of heart failure when my father was  only 12 years old
  • My father died at age 73
  • His mother ( Fannie married 3 times) outlived my father and died at age 107
  • Being the oldest, my father helped support the family
  • He was very neat and organized
  • Played basketball on the school team in high school for Trenton Central High School 
  • He graduated high school in 1929 and attended Rider College for 1 year
  • Attended his 50th high school re-union ( died 4 years later) 
  • Loved to dance, danced often, and was a good dancer
  • Grew outstanding yellow, red, an pink roses along the entire side of our house
  • Loved to play cards ( poker and pinocle) and played with a group about 2 nights /week
  • Loved dogs
  • He never shouted
  • Was very generous to family and friends
  • His favorite meal was roast beef, mashed potatoes and gravy
  • Loved homemade potato latkes, prune hamantashen, and kosher brisket
  • Brought me chocolate as gifts and paper cut out dolls to play with 
  • Was very likeable and had lots of friends
  • Was handsome 
  • Worked hard at two jobs to make a living
  • Loved and was devoted to family and extended family
  • Liked to have fun
  • Had two daughters-  Rita Lee from his first marriage to Harriet; Judee from his second marriage to Rae
  • Three grandchildren- Howard ( Rita's son) , Jonathan, Jason ( Judee's children) 
Potato Salad Recipes:

Vegan Potato Salad ( healthy) 

Easiest Homemade Potato Salad

Slim and Trim Potato Salad

My Skinny Potato Salad Alternative


Pin It Please leave a comment so I know you stopped by. Scroll down to the end of the post and click on comments.

Sunday, June 14, 2015

Plantain Pizza Crust ( GF)


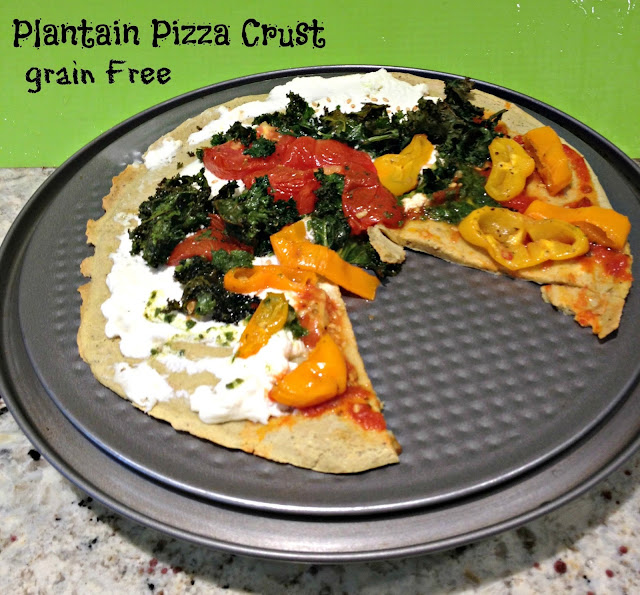
Plantain pizza with roasted vegetables


This recipe makes a fast and easy homemade pizza crust that you can make from start to finish in 25 minutes. The secret is a little known savory" fruit" called a plantain. Plantains are in the banana family, but when they are green, they are much starchier and not at all sweet. They are rich in vitamins A and C and low in calories ( 90 calories /cup) and low in fat. In their starchy state ( when they are green),plantains are perfect for making gluten free crusts, crackers, flatbreads, etc.

plantains on a napkin
Plantains that are still green enough to make pizza crust

A few months ago, my friend Laura introduced me to a delicious gluten free flatbread that she had made using plantains. Up until that point, I really didn't know what to do with a plantain. I barely even knew what they were. Today, I made my first gluten free pizza crust using a single green plantain that cost me 50 cents.

The pizza crust was so easy to make, it bordered on ridiculous. I just peeled and cut one plantain into chunks and added the chunks, one egg, and a little seasoning into my blender. Two minutes later, my batter was ready. I scooped the batter out of the blender and using a regular spoon, I spread it on a piece on parchment paper in a 10 inch round shape. I then popped it into a pre-heated oven and waited 15 minutes for my crust to bake. DONE!

How did it taste? great
How did it cut?   great
Could you hold a slice ? Yes, it was strong
Great Leftovers: The next day, the cold leftover slices tasted even better. I liked them cold so much, I didn't even bother to attempt to heat them back up.

Where do I find plantains?
A plantain looks just like a banana, but a little bigger, thicker skinned, and usually green.
They are usually kept right near the regular bananas in the supermarket.
You want to buy them when they are green. They will turn yellow and become spotted. When this happens, the natural sweetness starts to come out and the plantains won't be good for pizza crust. Pizza crust calls for green plantains.

If you are looking for an alternative to grains, plantains are an easy and suitable must try substitution.


Author: Judee Algazi
Prep Time: 5 minutes
Bake Time: 15 minutes
Topping Bake Time: 10 minutes
Serves 2

Ingredients: 
1 large plantain, peeled and chopped in medium chunk size pieces
1 large egg
1 Tablespoon toasted sesame seeds ( this really adds to the flavor of the crust)
Salt and Pepper to taste
2 shakes of Trader Joes' 21 Salute ( a salt free herbal blend like Mrs. Dash)

Directions:
Preheat oven to 350 degrees
Cover a cookie sheet with parchment paper.
Slice, peel, and chop 1 large plantain
Add the chopped plantain to a blender along with the egg, sesame seeds, and seasoning.
Blend until everything is well blended ( about 1-2 full minutes)
Scrape the batter from blender and using a spoon and spread the batter into a 1/4 inch thick - 10 inch round circle on a piece the piece of parchment paper.

Bake for 15 minutes at 350 degrees-
remove from parchment paper and cool the pizza crust on a wire rack.
Turn up the oven to 425 degrees .
Cover the pizza crust with sauce and or toppings of your choice
Return to the parchment paper, place on the metal rack ( as opposed to a cookie sheet)  and bake another 5-10 minutes until toppings are warm.

Cut the plantain in quarters and peel


batter spread on parchment paper
Spread batter in 1/4 inch depth and 9-10 inch circle

Bake for 15 minutes

roasted vegetables and kale
Roast any vegetables of your choice ( I did my favorite- peppers, tomatoes, garlic) and made some kale chips

Roasted vegetables on a plantain pizza crust
I topped and spread with 1/2 ricotta cheese and roasted vegetables

Other Toppings: 
I used ricotta cheese , kale chips, and roasted tomato and pepper
or try spaghetti sauce, shredded cheese, and mushrooms
or any roasted veggies and cheese

If you want to know more about why plantains are so good for us, Dr. Axe covers it in his article 7 reasons to add plantains to your diet
photo from Dr. Axe's article


This post will  be shared on  
My blog carnival list

Want to be added to My blog list? Let me know


If you are new to my blog and would like to be notified when I post a new recipe, please enter your email. Don't miss a recipe - about one or two a week.  ( you can unsubscribe at any time) subscribe by going over to the right side column and look for subscribe by email.


I am an affiliate for Amazon and I do receive a small compensation if you purchase on Amazon through my blog. I appreciate the support to cover the expenses of running the blog.


Food is my passion. I am gluten intolerant, busy. and strive for a healthy balanced lifestyle. It has taken me many years to come up with easy healthy recipes that meet gluten free, vegetarian and real food standards. On my blog I share my journey, my struggles, my discoveries, and my new recipes. I hope you find ideas, resources, and recipes that will be helpful to you. Come Back soon.


Author: Judee Algazi
Pin It Please leave a comment so I know you stopped by. Scroll down to the end of the post and click on comments.

Pin It Please leave a comment so I know you stopped by. Scroll down to the end of the post and click on comments.

Tuesday, June 9, 2015

Gluten Free Flat Breadsticks


basket of gluten free breadsticks


Flat breadsticks are all the rage and this quinoa flat breadstick recipe is healthy, crunchy, easy, and delicious. Quinoa is versatile and there are quite a few ways to work with this tasty seed. We normally eat our quinoa as side dish, like one would eat rice. In it's own right, it is delicious.

However, for this recipe I toasted the dry uncooked quinoa seed in a skillet and mixed it with toasted sesame seeds. I then used it as the base of this crunchy flat breadstick. It was fast and easy and very tasty. Toasting dry seeds really brings out a nutty flavor and completely changes the original taste.

My husband loves crunchy snacks like these! Baked in the oven at a high temperature, these flat breadsticks become crispy. The quinoa, eggs, and cheese are rich in protein, making them a good choice for kids too. To add to the flavor, you can experiment with different seasonings to enhance to the taste: italian seasonings, cajun seasonings, garlic salt, lemon zest? It's your choice.

I like my breadsticks best plain or with Italian type seasoning added before baking ( dried basil, garlic power, dried oregano) . You could also make these like pizza sticks plain and add some pizza seasonings right before eating.

This recipe will require that you toast and cook the quinoa before assembling the quinoa dough for baking.

Author: Judee Algazi- Gluten Free A-Z Blog
Prep Time: 10 minutes
Cook Time: 15 minutes
Bake Time: 20 minutes
To do in advance: 
1. Line a cookie sheet with parchment paper and set aside for later.
2. Preheat oven to 425 degrees

Ingredients: 

1/2 cup dry uncooked quinoa, ( washed and well drained)
1 cup boiling water
Olive oil spray for toasting
2 large eggs, beaten
1/3  cup of toasted sesame seeds
1/2 cup of shredded Mozzarella cheese
2 Tablespoons of grated Parmesan or Romano cheese
optional: 1/4 cup of parsley, chopped fine
1 tsp. of cracked black pepper

Directions: 
To begin: 
Spray a small skillet with olive oil spray, add well drained uncooked dry quinoa to the pan, and pan toast ( stirring occasionally)  for about 5 minutes until all liquid is absorbed. Add boiling water, cover , and simmer the quinoa for 15 minutes until all water is evaporated. Remove from heat but leave the lid on allowing the quinoa to steam a little more if desired. Eventually, allow quinoa to cool ( remove lid).

When cooked quinoa is cooled: 
In a large bowl mix quinoa, toasted sesame seeds ( I bought mine toasted), eggs, cheeses and black pepper. Spray the parchment paper with olive oil spray and spread the mixture about 1/4 inch thick into a large rectangle ( about 10 X 8) on the parchment paper. Bake in the preheated oven for 20 minutes ( checking to see it the tray needs turning) . Remove from oven, place on wire rack for 5 minutes before slicing. Slice into 8-10 flat breadsticks.


Batter of quinoa, eggs, and toasted sesame seeds
Toasted and cooked quinoa, toasted sesame seeds, cheese, eggs, and parsley mixed in a bowl


breadstick batter on parchment paper
Breadstick dough shaped into a rectangle on parchment paper on a cookie sheet

Quinoa breadsticks cooked
The breadstick mixture baked and crunchy just before cutting into strips

gluten free breadsticks in a basket

This post will  be shared on  

My blog carnival list


If you are new to my blog and would like to be notified when I post a new recipe, please enter your email. Don't miss a recipe - about one or two a week.  ( you can unsubscribe at any time) subscribe by going over to the right side column and look for subscribe by email.

I am an affiliate for Amazon and I do receive a very small compensation if you purchase on Amazon by clicking through my blog. I do appreciate the support that helps cover the expenses of running the blog.


 Please leave a comment so I know you stopped by. Scroll down to the end of the post and click on comments.

Sunday, June 7, 2015

Pot Luck Dinner Recipe


Closeup bowl of Mexican Bean Bake


Sometimes you just need a simple recipe to bring to a family gathering or pot luck dinner.
It doesn't get much easier or economical than this delicious Mexican Bean Bake.
All you have to do is assemble the ingredients, bake, and bring. It serves at least 8 decent size portions and is very tasty and satisfying. It's a meal in itself and can be served with gluten free chips, sour cream or Greek yogurt, and cut up veggies.

I'm on my way to a pot luck dinner right now at the farm for my CSA. I've never attended one before, but I'm guessing it's a nice way to meet other like minded people who want to eat organic and healthy meals. The weather is beautiful, so we are looking forward to eating outside in the country.

Even though the farm is just 20 minutes from our house, my husband says the air just smells better on the farm.

I actually posted a similar version of this recipe when I first started blogging, but it didn't get a lot of visibility, so I decided to share it again now. I did modify the recipe as it has evolved over the past 2 years. Although it is a vegetarian recipe , you could easily omit the cheese out and make it vegan.

It really is a great recipe! I don't make it often, but when I do everyone loves it.
Pin it for a future pot luck, BBQ, or family dinner. Can be eaten over rice or quinoa!

Ingredients: 
2 16 oz cans of organic pinto beans, drained ( or make your own beans 2 cans = 4 cups cooked beans)
2 16 oz cans of organic black beans, drained ( or make your own 2 cans= 4 cups cooked beans)
1 large can of organic chopped organic tomatoes
2 TBSP organic tomato paste
2 teaspoons of cumin
1 tsp garlic powder
salt and pepper to taste
1 cup of shredded cheese of your choice
1 additional cup of shredded cheese for the top
Optional: add corn, hot pepper, red pepper

Directions

Preheat oven to 375 degrees

In a large mixing bowl, mix the beans, chopped tomatoes, tomato paste, cumin, garlic powder, salt and pepper. Add 1 cup of shredded cheese and mix. Pour into a 9 inch Pyrex, top with additional cheese and bake for 40 minutes. Remove from oven, allow to cool somewhat and pack and go.. I have a flat strong basket that I use to transport cooked food. 

Pyrex bowl filled with Mexican beans and Cheese


This post will  be shared on  

My blog carnival list

Want to be added to My blog list? Let me know


If you are new to my blog and would like to be notified when I post a new recipe, please enter your email. Don't miss a recipe - about one or two a week.  ( you can unsubscribe at any time) subscribe by going over to the right side column and look for subscribe by email.

I am an affiliate for Amazon and I do receive a very small compensation if you purchase on Amazon through my blog. I appreciate the support to help cover the expenses of running the blog.


Photo from Gluten Free A-Z BlogFood is my passion. I am gluten intolerant, busy. and strive for a healthy balanced lifestyle. It has taken me many years to come up with easy healthy recipes that meet gluten free, vegetarian and real food standards. On my blog I share my journey, my struggles, my discoveries, and my new recipes. I hope you find ideas, resources, and recipes that will be helpful to you. Come Back soon.

Pin It Please leave a comment so I know you stopped by. Scroll down to the end of the post and click on comments.


Pin It Please leave a comment so I know you stopped by. Scroll down to the end of the post and click on comments.

Wednesday, June 3, 2015

Zoodles in Oil Free Vegan Pesto Sauce


zoodles in a avocado pesto sauce


spiralizer


I just finished eating this fabulous bowl of zucchini zoodles that I drenched in a creamy vegan kale/basil avocado pesto sauce ( oil free)  and topped with some halved cherry tomatoes! So simple and so delicious! Took 10 minutes to make! ( The avocado puts this pesto over the edge)

What are zoodles? Zoodles are made from a raw zucchini, are low in calories, and are fast and easy to make using a little tool called a spiralizer . It is the biggest rage and you can make so many amazing recipes with it.

Some of my readers may remember my post a week ago for curly baked sweet potato fries easily made with my spiralizer. I'm at it again using my spiralizer; however,  instead of using a sweet potato, I used raw zucchini! 

The spiralizer is a kitchen gadget that is relatively inexpensive ( $15-$30 ) and enables you to take ordinary vegetables like beets, zucchini, sweet potatoes, potatoes, cucumbers, carrots etc. and turn them into spaghetti like strands that resemble noodles!

My favorite vegetable to use in the spiralizer is zucchini to make spaghetti strands which have become affectionately known in the blogging circles as "zoodles".

The Pesto Sauce: I made my pesto without nuts to keep the calories down. ( however, you can add pine nuts if you wish) I think it still tastes great! It's a perfect summer dish because there is no need to turn on the oven, yet you can still enjoy a delicious meal.

 I like the zucchini raw, but if you don't- you can lightly sauté your raw zucchini strands for a few minutes first. When the zucchini is cooked to your liking, whip it out and toss with the pesto! Otherwise, just toss it raw ( as I do)  and enjoy!

Where do you buy a spiralizer? 

I bought mine online on Amazon. I've been using it for 3 years.
It's light, easy to use, and easy to wash.  .Spiralizer By Palermo- Voted the Best Vegetable Maker, 
I would recommend it!


Author: Judee Algazi
Prep Time: 10 minutes
Cook Time: optional 5 minutes if you choose to sauté it
Serves: 2

Ingredients: 
1 med to large zucchini
1/2 Hass  avocado, peeled and pitted ( as opposed to the Florida larger avocado)
1/4 cup freshly squeezed lemon juice
1/4 cup water
1/2 cup fresh basil, packed down
1/2 cup fresh kale, packed down
optional: 1/4 cup of pine nuts ( I did not use any)
10-12 cherry tomatoes of all colors, halved

Directions
Prepare your zucchini using a spiralizer and set aside. ( sautee in some vegetable broth for a few minutes if you like your zucchini cooked.

Oil Free Pesto:
Blend the avocado, lemon juice, water, kale and fresh basil in a food processor or blender until well blended ( I used a Bullet) . In a mixing bowl, toss the zoodles, avocado pesto, and halved cherry tomatoes.

Serve ! Yum..


one zucchini


zucchini noodles
The Palermo thicker strands


spiralized zucchini in avocado pesto sauce
This tasted amazing!!!!


This post will  be shared on  

My blog carnival list

Want to be added to My blog list? Let me know


I am an affiliate for Amazon and I do receive a very small compensation if you purchase on Amazon by clicking through my blog. I do appreciate the support that helps cover the expenses of running the blog and allows me to continue to provide free content!


Healthy Food is my passion. I am gluten intolerant, busy. and strive for a healthy balanced lifestyle. It has taken me many years to develop easy healthy recipes that meet gluten free, vegetarian/vegan and real food standards. On my blog I share my journey, my struggles, my discoveries, and my new recipes. I hope you find ideas, resources, and recipes that will be helpful to you. Don't forget to follow me to receive a notification when I publish a new recipe. Come Back soon.

Pin It Please leave a comment so I know you stopped by. Scroll down to the end of the post and click on comments.
Printfriendly