Friday, July 25, 2014

Vegan Caprese Appetizer


avocado tomatoes and basil on a rectangular plate

Looking for a vegan appetizer or supersalad? This one is perfect. Just one look at this incredible creation and you will understand why it tastes amazing even without the traditional cheese that is usually in a Caprese salad. 

This is my vegan version of a tomato and mozzarella Caprese salad appetizer. I substituted avocado for the sliced mozzarella.

I served this appetizer at a party a few weeks ago. Believe me when I tell you that here was not a morsel left. No one seemed to miss the cheese.

platter of vegan appetizers with avocado, tomatoes


It's amazing how many people prefer not to eat cheese these days. Some people are following a vegan diet, some are just not eating dairy for allergy reasons, and others feel that cheese is too fattening. Whatever the reason, a dairy free appetizer is a good choice to serve at parties.

Our Jersey tomatoes are just starting to come into season and my patio is full of fresh herbs in pots.  I love the contrast of the rich red Jersey tomato against the lovely green avocado, fresh basil and thick juicy cucumber. I had a few sprigs of fresh rosemary from my garden so I placed them on it as well. Doused with a little sea salt and lemon juice, this tasted sensational.


avocado , basil, and tomato appetizer

vegan appetizer display


I'm including more healthy fats such as avocado into my daily diet. The fats keep me full longer and I don't seem to be craving as many snacks. 

I finish my last meal by 7:00 pm and then I don't eat again until around 11:00 am. This gives me my 16 hours. I do drink my weight loss apple cider vinegar cocktail around 9:00 AM. ( and then I exercise). I'm amazed that I am not hungry, my blood sugar stays stabilized, and I am truly hungry around 11:00.

I usually eat a large green salad with some tomatoes, red peppers, cucumbers etc. and some protein and some avocado or salad dressing. If I get hungry before dinner ( 5:30 or 6:00 ish?) I snack on some nuts.

The key is to eat enough healthy fats to stabilize the blood sugar and satiate. I do eat dairy because I'm a vegetarian and I'm trying to eat lower carbs so I have been cutting out beans and grains.

Even I can't believe that I'm not hungry and craving. I've been doing this for about 6 weeks and have lost 6 pounds - my cravings are mostly gone.

This appetizer fits into my eating plan perfectly. I really do try to focus on including lots of fresh herbs from my garden like different varieties of basil, rosemary, thyme etc. which are packed with antioxidants.


Judee @ Gluten Free A-Z Blog
Prep Time: 7-10 minutes
Cook Time: None
Appetizer

Ingredients: 
2 avocados, sliced
2 large tomatoes, sliced
1 large cucumber, sliced
1 cup fresh basil , chopped
2-3 sprigs of fresh rosemary
juice of 1/2 lime or lemon or balsamic vinegar
Salt and fresh cracked pepper to taste

Directions: 
Arrange tomatoes, avocado, and cucumber on a plate by placing the tomato first, a piece of cucumber behind it and a piece of avocado on top of the tomato. Sprinkle with freshly chopped basil and sprigs of rosemary. Drizzle lemon juice on top of salad toppings and then add the salt and pepper.

Don't leave without staying connected: Are you following me on Pinterest,
Gluten Free A-Z  and Twitter ?


If you like this idea please share it with your Pinterest followers 68 


Will be also shared on  Souper Sundays at  Kahakai Kitchen


Cooking with Herbs Lavender and Lovage
Pin It

Please leave a comment so I know you stopped by. Scroll down to the end of the post and click on comments.

Monday, July 21, 2014

Freeze String Beans Without Blanching


fresh string beans

Can you freeze string beans without blanching them first? You bet you can, and I'll tell you how. 
I picked 4 quarts of string beans from my CSA the other day. It was Thursday, and I realized that we had a full weekend of eating out planned, so I wasn't going to be able to cook all of those beautiful organic beans that I spent 1/2 hour picking in the hot July sun.

I considered cooking them up with a tomato sauce recipe that we like and then freezing them, but I really didn't have the time. I just wanted to freeze them quickly and worry about cooking them on another day. It was already late and I was tired, so I wondered if I could just freeze them without blanching the large bunch and then have to put them in ice water. Well, after a quick Internet search, I found my answer on a blog called An Oregon Cottage .

It turns out that I was not the only who wanted to skip steps. I was glad to know that Jami ( of An Oregon Cottage) actually tried the quicker method and she said it works great! According to Jami, skipping the blanching doesn't make a difference. Jami and her family like the taste results just as well without blanching the string beans as they do with blanching them. 

In fact, Jami said she sees no difference in taste. Jami experimented and told about it in her post.  I'm trusting Jami and  I'm simply washing, drying, snipping off the ends and freezing in zip lock baggies.

Jami had another clever trick on her site as well. She uses a straw to vacuum seal the baggies. I didn't have a straw, so I couldn't try it ( I know it's hard to believe I didn't have a straw) . But according to Jami it works great . I'm now following Jami's blog. She has lots of helpful ideas !

I'll let you know how the freezing works out. I left my beans whole, although I could have chopped them into bit size pieces. The uncut string bean works fine for us. If you have smaller children, most likely you would want to cut the beans into smaller pieces prior to freezing. 

fresh string beans
I washed them and dried them well to avoid any ice crystals forming when I freeze them
I still have a few zucchinis to use up too from my CSA this week, so I'm going to make Nona's crust-less zucchini quiches and freeze them. They will be perfect for my next party! They take about me about 5 minutes prep and 40 minutes to bake. I'll bake them before freezing them since they have eggs in them. 

 I love your comments, so please leave one. It introduces me to your blog, and I love to stay connected . I will visit and follow you on Twitter and G+ etc. 

Don't leave without staying connected: follow me on Pinterest,  Gluten Free A-Z  and Twitter too
Subscribe to Gluten Free A-Z Blog by Email

If you like this idea please share it with your Pinterest followers Pin It 


This post may be share some of the following Weekly

I am an Amazon affiliate and make a small percentage when you purchase from Amazon from my blog which helps defray the cost of running this blog.  Of course I only recommend what I believe in. Thanks for your support.

Pin It

 Please leave a comment so I know you stopped by. Scroll down to the end of the post and click on comments

Saturday, July 19, 2014

Paleo English muffins ( Quick)

Grain Free English Muffins on a plate


Grain Free English Muffins

Why am I making a Paleo recipe? I have been gluten free for 14 years, but I've only been grain free for 6 weeks and I'm trying add more variety to my grain free diet. Paleo baked recipes are usually fabulous, low carb and healthy.  This recipe makes one muffin and only has 2.5 net carbs,

There are three reasons that I like a recipe which only makes one serving .
1. It's really quick and easy ( I can make it fresh for my own breakfast)
2. I won't over eat ( portion control) It only makes one muffin
3. Leftovers won't end up getting stale. ( sometimes I make things with coconut flour,  and if we don't eat it immediately by the next day it starts to dry out)

Did I mention that I'm trying to lose weight ( yes again- that 10 pounds just won't stay away) and low carb works best for me not only for weight loss, but to also help stabilize my blood sugar. I've been eating mostly vegetables, salads,  nuts, and proteins but I'm craving something more. I think this low carb grain free English muffin will do it for me ! AND Since I'm doing low carb, I can put butter on it! Yum!

I would consider following the ever popular Paleo diet, but as a vegetarian, it would be difficult and  limiting. I think the Paleo concept and way of eating is a good one. I think in general we eat way too many processed foods and too much sweets ( even fruit) .

Beware! Today's fruit is not like fruit of years ago. Today's fruit is much bigger, much sweeter, and much more plentiful. People used to eat fruit in season- they even gathered their own berries and ate less of it. That may have been a good thing.

Today's fruit is mostly hybrids that have been developed to be larger, sweeter, and more beautiful . The larger size and sweeter fruit may be more than our blood sugar can handle. I believe that today's fruit is just way too full of sugar (Despite being a fruit lover) . I've cut back on the amount I eat, and truthfully I feel better and my blood sugar is more stable. I concentrate on eating berries which are the lowest glycemic index fruits. ( My change in attitude was a result of reading Wheat Belly by Dr, Davis and Grain Brain by Dr. Perlmutter- two new books by doctors who say grain and sweets are setting us up for diabetes, all kind of autoimmune disorders, arthritis, skin problems, and even brain fogginess, learning problems and dementia.

Prior to making the change in my diet to lower carb, I had been feeling tired, foggy, and had a lot of mood swings. I was craving sweets and overeating. Since I cut out the grain and limit the fruits- I actually do feel better. I feel like I'm less foggy, I stopped craving sweets, and the mood swings are gone. I have more energy too.

Back to the recipe: I saw thie grain free Paleo bread recipe that I'm making today on a site called Simply Vegetarian Paleo  . The site posts recipes authored by lots of different bloggers.

This particular Paleo English Muffin recipe came from a healthy blog called Beauty and The Foodie.  .I liked the blog so much , I am now a follower. Kathy posts lots of recipes worth checking out. Apparently there are ways to be a vegetarian and follow the Paleo diet. This is my adaption of Kathy's recipe.

Author of this recipe: Judee Algazi
Prep Time:

Ingredients:
1 egg beaten
1 Tablespoon of Almond Milk
1 Tablespoon of coconut flour **( if you are not on a grain free diet, you could try gf flour mix)
1/2 Tablespoon of coconut oil ( or olive oil)
1/8 teaspoon of aluminum free baking powder
optional: if you like it a little sweetness  add 1/2 tsp honey and 1/8 teaspoon vanilla extract

Directions:

Preheat oven to 400 degrees
Beat the egg in a bowl add then  remainder of ingredients and mix with a fork until smooth. Transfer batter to a single ramekin and bake at 400 degrees for 12-15 minutes.( Stacy from  Beauty and The Foodie  said you can also microwave the ramekin for 1 and half minutes -I don't usually microwave if I can help it, - but it would be fast)

Once baked. Take a knife and loosen the sides of the ramekin and the muffin will slide right out. When cool enough to handle, slice the muffin in half and toast it in a frying pan, making sure to press it down.
 It's uncanny  how it looks exactly like an English Muffin. 

** MY Notes: Personally, I liked it but it didn't exactly taste like an English Muffin to me. It tasted a little egg-ier at first. However, I found a way that I did think it tasted more like an English muffin. After toasting and cooling, I placed it in the refrigerator uncovered for a few hours. It wasn't as eggy and was dry and crisp- more like an English Muffin.( you could probably put it in the fridge for 1/2 hour)

 Spread it with nut butter or fruit spread and enjoy. It holds together very well and is grain free, gluten free, healthy with the looks and has the consistency of an English muffin.

I now make mine the night before, and leave it in the fridge so I have it in the morning .

It's so fast an easy, why not try it for yourself and let me know your opinion.


If you like this recipe, please share by pinning it Pin It

Please leave a comment so I know you stopped by. Scroll down to the end of the post and click on comments.

black ramekin
 My ramekin

black ramekin with batter
ramekin with batter

Paleo English Muffin
After baking 


untoasted English Muffin
I cut the baked muffin in half with a sharp knife


I placed the muffin halves in a sprayed pan and cooked on each side ( don't forget to flip it over) 


Place a plate on top of the two muffin halves to press them down or use a spatula

Paleo English Muffins


Paleo English Muffin with herbs
I made another batch with chopped herbs from my garden

Books I recommend 


I am an Amazon affiliate and make a small percentage when you purchase from Amazon from my blog which helps defray the cost of running this blog.  Of course I only recommend what I believe in. Thanks for your support.

If you like this recipe, please share with your Pinterest Followers  Pin It

 I love your comments, so please leave one. It introduces me to your blog, and I love to stay connected . I will visit and follow you on Twitter and G+ etc. 
Don't leave without staying connected: follow me on Pinterest,  Gluten Free A-Z  and Twitter too


This post may be share some of the following Weekly

Monday, July 14, 2014

Asian Peanut Coleslaw

Super coleslaw with peanuts and thai dressing


Need a salad to bring to our next party? This Asian Peanut Salad looks and tastes spectacular. My friend Melissa is an amazing cook. We attended a BBQ last Sunday, and she brought this healthy delicious salad. It's an Asian version of coleslaw with peanuts, peanut butter dressing and edamame. It tastes sensational and is easy to assemble.

It's gluten free, grain free, vegan and has a wonderful flavor that everyone seems to love. In addition, it looks beautiful and inviting. Another friend brought this to a party and there was not one morsel left.

After one bite, I began to take pictures and am sharing the recipe because it was such a big hit with everyone.I loved the crunchiness of the peanuts and the Asian spices.

Very Easy to Make

The salad itself is easy to make. You can start with a basic bag of coleslaw  mix of green and red shredded cabbage and some shredded carrots that is available in most supermarkets (or make your own  in the food processor).add a few red peppers, scallions, and cucumber and you have almost the full salad base.

The dressing is made quickly in the blender and is fresh and spicy. As usual, I don't like things that are "hot",  so I will leave out the hot pepper flakes.

Cabbage is full of fiber, cancer protective antioxidants, and vitamins. It's a great choice for a healthy
addition to any meal.
                        thai dressing over peanut coleslaw

Melissa said it was her husband Stu who actually found the recipe online. It was from a blog called Once Upon A Chef. Jen posted lots of step by step pictures and has a fabulous blog with lots of fresh real food. She is worth visiting. In fact,  I just started to follow her. Other than leaving out the red pepper flakes and cutting out the sugar, I just made some minor personal taste adaptations.


Thai Crunch Salad with Peanut Dressing

Ingredients

For the Thai Peanut Dressing

  • 1/4 cup creamy almond butter or peanut  butter
  • 2 tablespoons  rice vinegar
  • 2 tablespoons freshly squeezed lime juice
  • 2 tablespoons olive oil (2022 update: I'll leave it out!)
  • 1 tablespoon gluten free soy sauce
  • 3 tablespoons honey
  • 2 garlic cloves, pressed
  • 1-inch square piece fresh ginger, peeled and chopped
  • optional: 1/4 teaspoon crushed red pepper flakes
  • 2 tablespoons fresh cilantro leaves
  • salt to taste

Ingredients For the Salad

  • 4 cups chopped Napa cabbage or shredded coleslaw mix 
  • 1 cup shredded carrots
  • red bell pepper, very thinly sliced into bite size pieces
  • 1 small English cucumber, halved lengthwise, seeded and thinly sliced
  • optional: 1 cup cooked and shelled edamame 
  • 2 medium scallions, thinly sliced
  • 1/2 cup loosely packed chopped fresh cilantro

Instructions

  1. For the dressing, combine all of the ingredients except for the cilantro in a blender and process until completely smooth. Add the cilantro and blend for a few seconds until the cilantro is finely chopped. Refrigerate until ready to serve.
  2. For the salad, combine all of the ingredients in a large bowl and toss to combine. If serving right away, drizzle the peanut dressing over top and toss; otherwise, serve the dressing on the side so the salad doesn't get soggy.

 I love your comments, so please leave one. It introduces me to your blog, and I love to stay connected . I will visit and follow you on Twitter and G+ etc. 
Lets stay connected: follow me on Pinterest,  Gluten Free A-Z  and Twitter too

This post may be share some of the following Weekly
blog carnivals


Will be also shared on
SouperSundays

Pin It Please leave a comment so I know you stopped by. Scroll down to the end of the post and click on comments.

Wednesday, July 9, 2014

Watermelon, Mint and Orange Blossom Water


watermelon balls and chopped herbs

There is nothing more refreshing than cold watermelon on a hot summer's day.
If you really want to make it exotic, try adding  drops of orange blossom water or fresh mint,


 Orange blossom water is  an extract that can be purchased in some supermarkets and most ethnic stores ( Indian, Middle Eastern, Greek, etc.) It is inexpensive ( about $4.00 a  bottle from an ethnic store). It is very delicious and has the most divine fragrance that turns ordinary watermelon balls into an exotic treat! It makes a perfect offering for company, but it's so easy to make you could treat yourself any time you like.

Lately, I have been cutting my watermelons in half and then scooping it into melon balls. It looks so pretty, is easy to eat and truthfully really doesn't take much longer to make the little melon balls than cut up the whole melon. The greatest benefit is that there is hardly any waste of the watermelon , and I only make the one cut with the knife, making it easier on me.


Watermelon Juice

After I scoop out all the little balls, there is a huge amount of juice that accumulates in the shell of the melon. I pour the watermelon juice into a class and someone always enjoys it as a healthy refreshing drink.

Watermelon Smoothies

I also scrape the remaining parts from between the melon ball scoops and save that as well for smoothies. I'm telling you there is no waste this way. ( when i cut it off the rind, I usually get too close and loose some of the melon.)

The other day I had a group of women over, and I served the watermelon balls three ways.

  • watermelon balls soaked in orange blossom extract
  • watermelon balls tossed in freshly chopped mint
  • watermelon balls tossed and soaked 

I put out toothpicks and they"  "noshed" at their discretion. No one had ever had orange blossom extract before, and I can tell you it was a big hit. Of 6 women, everyone commented, raved, and kept going back for the soaked orange blossom ones. So, this is no ordinary recipe. Try it , you'll like it..


watermelon and mint
The green is cut up fresh mint 

                            watermelon balls, fresh mint and orange blossom water
If you are unfamiliar with orange blossom water. It's the exotic flavor that you taste in Baklava and other and Middle Eastern pastries. It is a perfumy tasting extract that adds a delightful flavor.


Cool Off With Orange Blossom Water and aah!! 

It's sensational on watermelon and is also fabulous on a washcloth to cool you down. ( Fill a bowl with water and some ice cubes- add a few drops of orange blossom water-


  1. Use it as a foot bath 
  2. dip the wash cloth in the cold water and wring it out. - Place it on your forehead. 
  3. You will immediately be cooled off and the aromatherapy of the fragrance will be heavenly. I've been to spas that do the washcloth thing)


Ingredients for the watermelon treat!

1 watermelon, cut in half and then scooped into melon balls.( Use the portion you like)
1/4 cup or more of orange blossom water for an entire watermelon
If you are  serving a medium bowl of melon balls ,  use 1 teaspoon of orange blossom
1 cup of watermelon juice or water

Instructions:

Put watermelon balls into a medium sized bowl.
Mix orange blossom water and liquid ( juice or water) in a cup. Pour on top of watermelon balls until saturated.
Allow to soak in the refrigerator until well chilled.
Pour off any liquid . Place in a nice dish and serve.

Pin ItPlease leave a comment so I know you stopped by. Scroll down to the end of the post and click on comments.


bottle of orange blossom water
Bottle of Orange Blossom Water
 I love your comments, so please leave one. It introduces me to your blog, and I love to stay connected . I will visit and follow you on Twitter and G+ etc. 
Lets stay connected: follow me on Pinterest,  Gluten Free A-Z  and Twitter too

This post may be share some of the following Weekly

Thursday, July 3, 2014

Broccoli Rabe Tossed in Pesto

                                    broccoli rabe tossed in pesto

You know you want to eat more greens, so why not try broccoli rabe?  
Don't be intimidated if you've never made broccoli rabe before.  It is like cooking any other green and this is an easy recipe that is really tasty.

Do you like Italian food? It doesn't get more Italian than tossing broccoli rabe, broccoli or broccolini  in a delicious pesto sauce.

Pesto is easy to make and generally made from four basic ingredients:
  • Fresh Basil 
  • Some sort of nut ( pecan, walnut,or pine nut)
  • Olive oil 
  • Italian Parmesan or Pecorini cheese

Because of the fresh greens, this recipe provides lots of energy giving chlorophyll and nutrients . The broccoli rabe is pungent, while the fresh basil is sweeter.

 If you like broccoli , you will probably like broccoli rabe or broccolini
( available year round in most supermarkets in the produce section). The taste is similar, but a little more bitter - which is what I love.

broccoli rabe in garlic
Plain broccoli rabe cooked in garlic 

Broccoli rabe is a little leafier vegetable and is kind of like a cross between spinach and broccoli. It is composed of some leafy vegetable and some baby broccoli heads. Sauteed in garlic, it's one of my favorites recipes ( click for basic recipe) 

Pesto is also commonly tossed in pasta, but pesto can be used to perk up any cooked vegetable. Simply cook the vegetable and then toss it with the amount of pesto of your choice.

Want to make dinner out of this recipe? You could toss in some cooked gluten free  pasta . The pasta, broccoli rabe, and pesto together would be filling and delicious. 

If you don't eat pasta, you could try it with spaghetti squash or "zoodles" ( noodles made by spiralizing zucchini-You can check out the spiralizers on Amazon:  Joyce Chen 51-0662, Saladacco Spiral Slicer, White is an inexpensive tool that I have used for years and so much fun. 

spiralized zucchini noodles in tomatoe sauce
Click here : " zoodles" made with a spiralizer tool and zucchini 

Pesto is a delicious seasoning that is perfect in the summer when fresh basil and spinach are seasonal and plentiful. I never really thought I would like it, but I was pleasantly surprised once I started to make pesto and enjoyed its rich flavor. I also realized its health value and its versatility. 

It's great for anyone on a low carb diet as well and you can simply omit the cheese if you are vegan.

I originally saw this recipe for pesto broccolini on a blog called What's Gaby Cooking. This is my adapted version of the recipe.

Ingredients to make the greens:
1 bunch of broccoli rabe, broccolini , or  1 head of broccoli, chopped
2 cloves garlic, chopped or pressed
Optional: pinch of red pepper flakes
2 Tablespoons olive or coconut oil

Directions:
Saute garlic in oil for a minute on high heat in a large skillet. Drop in the chopped greens and saute until slightly tender. Remove from the heat and set aside.

Ingredients for Pesto:

4 cups fresh basil
1/4 cup olive oil
1/2 cup walnuts or pine nuts
1 clove garlic, pressed
1/2 cup freshly grated Parmesan or Pecorini Cheese

Directions: 
Process the basil and nuts, then add garlic, freshly grated cheese and process. Slowly drizzle in olive oil as processor is running until a paste is formed.

Toss 2-3 tablespoons of the pesto into the greens and serve.

fresh grated Parmesan cheese

bowl of walnuts and Parmesan cheese


food processor with bail inside
Ingredients in the food processor 
  •                              
Quote: “Those who think they have no time for healthy eating will sooner or later have to find time for illness.”~ Edward Stanley

                                                  
I love your comments, so please leave one. It introduces me to your blog, and I love to stay connected . I will visit your blog and follow you on Twitter and G+ etc. 
Lets stay connected: follow me on Pinterest,  Gluten Free A-Z  and Twitter too

This post may be share some of the following Weekly
Cooking with Herbs Lavender and Lovage
                                                           
Pin It Please leave a comment so I know you stopped by. Scroll down to the end of the post and click on comments.

Wednesday, July 2, 2014

Spinach Basil Pesto


Spinach, parsley, and basil make a wonderful summer pesto that can be used in a variety of ways.  This pesto has an interesting mild flavor and is very easy to make. 


With my prolific crop of summer basil this week, I've made a significant amount of pesto. 
I've been eating homemade fresh spinach basil pesto on just about everything and I froze some. 


It tasted great tossed in gluten free pasta, pesto with zoodles,  spaghetti squash,  tossed in salad, stuffed in  raw button  mushrooms, spread on crackers, etc.  


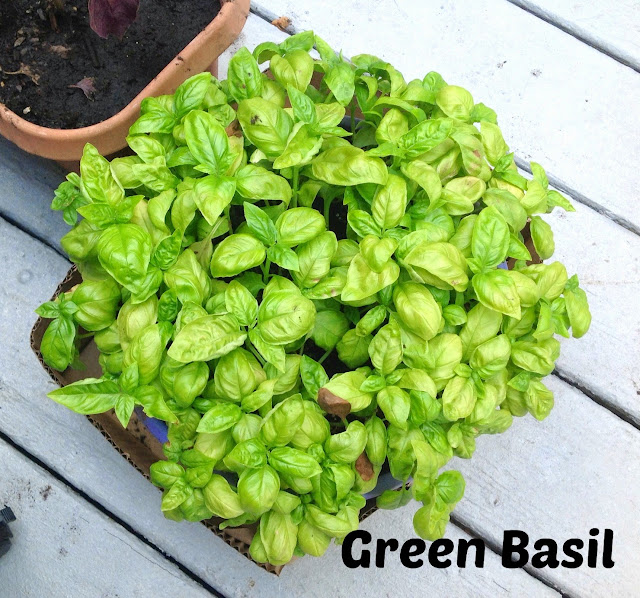
fresh green basil plant

 I used green basil for this recipe, but there are many varieties of basil. I grow three different types: Thai Basil, green basil, and purple basil. Each has it's own unique flavor and each adds an interesting kick to my recipes. This is basil season and you can grow it all summer in a container.


purple basil growing in a planter

basil in a pot

Basil is very easy to grow.  I bought a few organic small plants from Whole Foods (or a local farm store) and divided them into a few containers ( there is still time for you to do this) . 


I  removed the plastic pot that the basil came in, broke up the ball of soil a little and replanted the basil plant in a pot twice the size ( adding potting soil)  than the one it came in and one that has good drainage ( you can add gravel if you have to for better drainage).

The basil will grow all summer as long as you keep clipping it and don't let the plants begin to flower and go to seed. If you have space to plant your basil plants in the ground that works even better. I have some growing in the ground as well.


3 Tips You Need To Remember When Growing Basil: 

  • Basil likes sunlight
  • Basil likes water 
  • Basil likes to be well drained
Once your basil is growing, you can clip it to add to daily salads, morning omelettes, hot or cold soups, caprese salads ( basil and mozzarella cheese). Fresh basil tastes amazing! And fresh herbs are potently rich in immune building antioxidants, vitamins, and minerals.


Greens help you detox and cleanse
This delicious combination of spinach, parsley and basil can be made in minutes in the food processor and provides lots of greens to boost your chlorophyll intake which helps to naturally cleanse your system. What a great pesto !

The Pesto Recipe

Author: Judee Algazi @gluten free A-Z Blog
Prep Time: 10 minutes
Cook Time: None

Ingredients: 

1/2 cup of fresh organic parsley
1 cup of fresh basil 
1 and half cups of fresh organic baby spinach
3/4 -1 cup of raw nuts ( walnuts, or pecans, or pine nuts- each will impart a different flavor) 
1/4 cup freshly grated good quality Parmesan or Romano cheese ( vegans can omit) 
1/4 cup ( or more olive oil) 
1 clove of fresh garlic pressed ( optional- sometimes I'm not in the mood) 
cracked pepper to taste

Directions
Add the greens to the food processor and begin to process , then as the processor is running add the nuts, pepper and garlic. As it begins to form a paste add olive oil while the processor is running until pesto is smooth. In this recipe, the oil is a must.

My Notes : 
  • I store my pesto in a covered container for 3 or 4 days. 
  • If your pesto drys out, add a little oil to it ( mine never does) 
  • For variety, try making pesto each time with a different nut. It totally changes the flavor. I like the flavor of all three. Pine nuts and pecans are fairly expensive, so I've been sticking to raw walnuts  (raw walnuts are cracked right out of the shell type -as opposed to roasted walnuts- the raw variety works best in pesto)  
  • I think the pesto tastes really good with or without the garlic- depends on my mood
  • I buy a wedge of imported Pecorino Cheeese ( mine says Pecorino Roman " Fulvi" from the mountains of Italy and it's from grass fed cows with no hormones.) It comes in a HUGE barrel size hunk of cheese and the store cuts and wraps in the store in 1/2 pound pieces. It is outrageously delicious in pesto. 
  • Add pesto to omelettes, top a little of gf pizza, on gf bread with cheese
Antioxidants:  Herbs  like oregano, rosemary, thyme, parsley, cilantro, and basil have provide excellent health giving properties and  have been depended on for thousands of years to add powerful antioxidants to to people's food..Check out the Other herbs that I grow and some tasty recipes

***shared this link on Weekend Cooking at Beth Fish  which is a weekend food linky open to anyone with a food related post to share.

 I love your comments, so please leave one. It introduces me to your blog, and I love to stay connected . I will visit and follow you on Twitter and G+ etc.
Lets stay connected: follow me on Pinterest,  Gluten Free A-Z  and Twitter too

            This post may be share some of the following Weekly


Pin It Please leave a comment so I know you stopped by. Scroll down to the end of the post and click on comments.

Printfriendly