About us

Recipes - Pages

Pages

Sunday, February 26, 2012

Moroccan Harissa Soup

Follow Me on Pinterest
Pin It


Spiced Moroccan Carrot Soup


I love this spicy rich healthy carrot soup. It tastes exotic, yet is very simple to make.
I put a heart on my bowl of soup because according to 
an IVillage article " Spicy Foods Are Good for Your Heart". 
This recipe calls for a hot Moroccan spice blend called
"harissa" 
 - (a pasty combination of hot chili, cumin, coriander, garlic and other spices typically used in North African cooking in countries like Morocco, Algeria,and Tunisia.)- 

I didn't use it; it's too hot for me!! 

 Instead I just used the cumin, coriander and garlic. ( spices contain substantial amounts of immune building and anti-inflammatory antioxidants.) The color and flavor is exceptional because freshly ground spices are brilliantly colored, exceptionally fragrant, and bursting with health giving benefits.


It might be good for the heart, and you might really like it, but it's too hot for me. I toned my recipe down somewhat and just used the cumin, coriander, and garlic. I left out the hot peppers and added some white wine( Chardonnay)  for flavor. However, if you like things hot and spicy , you have to try "harissa" . A prepared version can be purchased in a can in most spice shops but you can make it yourself! It is a staple in most Moroccan homes and is used in many of their recipes. 

Here is a link for an authentic  homemade" harissa" recipe posted by 
Katherine Martinelli   on fabulous her blog.

Harissa Recipe

Authentic Homemade Harissa Recipe Katherine Martinelli   


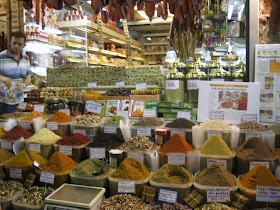
Lots of spices at the Spice Market in Istanbul
Fresh Spice Market in Istanbul, Turkey  (photo from our trip to Turkey in 2010)

Moroccan recipes are not new to me, as I already make a wonderful recipe called  Moroccan Spiced Lemon Carrots which I and everyone I've ever served it to adore ( It's lemony, not hot)  So, you can imagine how excited I was when I found this recipe in Vegetarian Times  for Moroccan Spiced Carrot Soup . I knew it was something we would love to try.

However, I wasn't prepared for how much we would love this soup. My husband and I found it to be exceptional.

 I adapted the recipe somewhat. So, the recipe that follows is my version.

Soup Ingredients:


  • 2 Tablespoons olive oil 
  • 1 additional TBS olive oil
  • 2 large onions, diced
  • 2 large red bell peppers, diced 
  • 3 Tablespoons tomato paste
  • 8-10 fresh cloves garlic, chopped
  • 3 medium-size carrots, diced
  • 2  russet potatoes, peeled and diced 
  • 6 cup vegetable broth
  • 1 cup tomato juice or V8 juice
  • 2 1/2 tsp. harissa ( a Moroccan spice made from hot peppers) 
  • Subtitle in place of harissa: 1 tsp cumin +1 tsp coriander
  • 1/2 cup white wine optional  ( the alcohol will cook out completely but imparts a  nice flavor )


  • Directions
    1. In a 6 quart soup pot add olive oil, onion, peppers, and garlic. Sautee on a medium heat for 3-5 minutes stirring frequently until vegetables are soft.    
    2. Add carrots and potato and cook an additional 4 to 5 minutes or until potatoes begin to become  brownish . Mix in tomato paste and continue to cook for another minute
    3. Add broth, tomato juice, and wine, and harissa. Reduce heat to medium-low and simmer 30 minutes, or until potatoes and carrots are soft.
    This soup may be seved chunky or use an immersion blender to puree until smooth. Season with salt and pepper to taste. 
    1. Serve chunky vegetable style ( my favorite) or
    2. Transfer mixture in small batches to blender or food processor, or use an immersion blender, and puree until smooth. Season to taste with salt and pepper


    Sometimes I prefer a milder soup, so I will use the wine for flavoring, but I leave out the cumin and coriander. Obviously,  it tastes different, but is very delicious and soothing . I usually eat my soup chunky.

    For an authentic homemade  recipe for harissa,  follow the link to a fabulous blog  by Katherine Martinelli      

    Harissa Recipe
    Authentic Homemade Harissa Recipe Katherine Martinelli   


    Please leave a comment so I know you stopped by. Scroll down to the end of the post and click on comments.

    Thursday, February 23, 2012

    Korean Bibimbap

    Soup, Vegetable Soup, Lunch, Dinner, Hot

    This post is about my first experience with Korean Bibimbap, not the soup above; However, the soup and the bibimbap are related.

    Last week, my husband and I  drove into NYC to visit my son and his girlfriend (now his wife).  We dined at restaurant called," THE SMITH MIDTOWN " at  956 SECOND AVENUE  NYC ( a must try).  

    Free photos of Farmer's salad

    The food was exceptional and gluten free friendly. 
     I ordered the roasted tomato soup with melted cheddar cheese  and a fabulous Greek salad with a wonderful creamy lemony dressing ( one of the best I ever had). 

    My husband, my son and his girlfriend all really enjoyed their choices as well; their choices were not gluten free ( the menu ) OK .... I'm getting to the Bibimbap.


    On our long walk to the restaurant, my son told me about a vegetarian gluten free entree he had tried at the restaurant once before called,  Bibimbap..  I was intrigued with the name to say the least, but I thought he was making it up just to be funny.

    It turned out my son wasn't joking. Bibimbap is a Korean dish that is quite popular in that American restaurant. 

     In fact, shortly after we were seated, a generous order of bibimbap whizzed by us on its way to a nearby table .

    The bibimbap was a layered salad made with sushi rice, shiitake mushroom, spinach, pickled carrot, edamame, bean sprouts, a sunny up egg right in the middle. I is served with a wonderful Korean sauce.

    Free photos of Food photography

    According to Wikipedia :
    Bibimbap (Korean pronunciation: [bibimbap][1]) is a signature Korean dish. The word literally means "mixed meal" or "mixed rice". Bibimbap is served as a bowl of warm white rice topped with namul (sautéed and seasoned vegetables) and gochujang (chili pepper paste). A raw or fried egg may be added. The ingredients are stirred together thoroughly just before eating.[2] It can be served either cold or hot.

    When I went online, I found out there are many variations of Bibimbap. Sometimes it is layered, sometimes it is arranged by item in a spring form type pan, sometimes it is just mixed together. Some versions are a little more Americanized and contain shredded carrots, zucchini, and more typical American fare. I looked for some on Pinterest, there were tons of recipes. I guess a lot of people are familiar Bibimbap.

     Use Real Butter. is a blog. She has a wonderful pictorial tutorial of how to make bibimbap step by step.. If you want to make it, check out her blog because the post was entertaining and the photos and tutorials wonderful. ( for me of course, I would leave out the beef)


    Have you ever had Bibimbap? Have you ever heard of Bibimbap? What's your Bibimbap story

    I LOVE YOUR COMMENTS! PLEASE LEAVE ONE
    Please leave a comment so I know you stopped by. Scroll down to the end of the post and click on comments.


    Tuesday, February 21, 2012

    Mardi Gras Creole Red Beans and Rice


    I don't usually make a Mardi Gras recipe , but these delicious spicy Creole red beans and rice got me in the mood!! I love making them because they can be made in the crock pot.

    I teach in a private boarding school, and today the French classes are wearing masks, celebrating, making crepes, dressing up etc. Even our school dining service jumped in by decorating the dining hall with colorful masks and metallic looking plastic beaded necklaces and featured a wonderful Louisiana Creole red bean dish for lunch that of course was gluten free. It was sooo good that I took a picture of my meal and secured the recipe. It's a fast and easy meal  that can be eaten over some healthy brown rice..


    Official Mardi Gras Beads from New Orleans brought back by my friends Peter and Paula


     I found out that red beans and rice are always a very a popular meal in New Orleans, and they are traditionally eaten on Mardi Gras as well. This spicy red beans and rice recipe is based on an authentic Louisiana Creole recipe . Although the original recipe included sausage, my school omitted it and made a vegetarian version because of a diverse population of students and faculty.

    You can make the recipe the fast way by using cooked beans or the slow way by  using dried soaked kidney beans and cook for about 3 hours.

    Personally, I like making bean dishes in the crock pot. I can start in the morning and have a hot tasty dish by noon. Ok, I love my crock pot and use it every chance I get. It makes life and clean up so easy!

    In addition, this is a pretty healthy meal and very economical.

    Also, if you are on Weight Watchers, this has a low Point Plus value.. Vegetables ( 0 points) and a full cup of beans ( a cup is 5 points)  and 1/2 cup brown rice (?) not sure , anyone know?
    You can skip the rice, and still enjoy a hearty meal that is spicy and oh so tasty..

    Ingredients:
    2 cans of kidney beans or 1 pound of dried kidney beans soaked overnight.
    When ready to use, rinse and set aside ( 4 cups cooked beans)
    2 large onions, chopped
    1 large red pepper, chopped
    2 stalks celery, chopped
    3 cloves garlic
    1 large can diced tomatoes or 5 plum tomatoes, chopped
    1 tsp of Cajun seasoning ( or salt, pepper, hot pepper, basil and thyme to taste)

    Directions for dried soaked beans method. 

    Dutch Oven: Put onions, red pepper, celery, and garlic in a large Dutch oven type pan. Add tomatoes , uncooked beans, and Cajun seasoning. Stir well and add water to cover beans. Bring to a boil, then simmer covered until beans are soft about 3 hours

    Crock Pot:
    Put onions, red pepper, celery, and garlic in a crock pot. Add tomatoes , uncooked beans, and Cajun seasoning. Stir well and add water to cover beans. Cook on high for 3 ish hours or until beans are soft or cook on low for 6-7 hours.

    Canned or pre-cooked Beans:
    Dutch Oven:  Saute all vegetable then add tomatoes, cooked beans and seasoning. Add 1/2- 1 cup of water or tomato juice or vegetable broth and cook for flavors to mingle for about 1/2 hour.

    Please leave a comment so I know you stopped by. Scroll down to the end of the post and click on comments.

    Sunday, February 19, 2012

    Spinach Stuffed Portobello Mushroom Cap


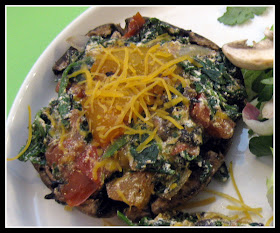
    spinach and cheese stuffed into a portobello mushroom cap in a bowl

    Large portobello mushroom caps are a  hearty base for this vegetable stuffed lasagna type dish. The mushroom cap is easy to work with and lends itself to stuffing. One thing I really love about this recipe is that it doesn't contain any noodle products that it is not high in carbohydrates or calories. You can enjoy the tasty filling without the carbs and of course it's gluten free.

    I've  been into mushrooms lately. I've been eating them raw in my salads, adding them to soups, and sauteing them over my food. I usually buy the little packages of sliced white or small portobello mushrooms, but this time I went for the large portobello mushroom caps and experimented to see what I could come up with.! I made this for lunch today and really enjoyed it. I ate it with a salad  and had some fruit for dessert.

    Mushrooms are very low in calories ( do they have any calories?), so they are a great food to eat when you are trying to lose a little weight.

    I made this recipe into a really a low- cal entree that was fast and easy.
    I give it about 3 "Points Plus" per cap on Weight Watchers!
    (If you are not looking to lose weight, feel free to use full fat cheeses! )

    small dog standing on the tile floor
    This is Ginger. She was our weekend guest!
     
    Ingredients: Makes 4 mushroom caps 

    4 portobello mushroom caps
    1 cup ricotta cheese ( I used no fat ricotta) or use mashed tofu if you want it dairy free
    1 cup cooked spinach, ( I used frozen make sure to drain well )
    1 T tomato paste
    6 Tablespoons low fat shredded cheddar
    1 large tomato, chopped
    1 medium onion , chopped
    3 cloves garlic, chopped
    Insides of mushrooms

    Directions:

    Prepare mushrooms
    Wipe each musroom well with a damp paper towel ( ok, i have to wash mine!!)
    Scoop out the insides and chop to add to filling.
    Set mushrooms aside to get ready to fill.
    
    
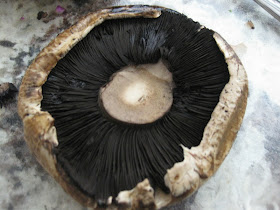
    t;mushroom cap on counter top
    scooped out mushroom ( the bottom is white)

    Filling:
    In a large bowl mix ricotta cheese and cooked spinach and set aside.
    Saute onions, tomato, garlic, mushrooms in a little olive oil spray in a skillet. Add tomato paste and cook a little longer.
    Transfer vegetables to ricotta cheese and spinach mixture. Add 4 T of shredded cheddar and mix well.
    Stuff mushrooms with the filling and top with remaining cheddar cheese.

    Place mushrooms on baking sheet and bake ( preheat overn) at 350 for 15 minutes or place in toaster oven.


    Mix ricotta cheese, cooked and drained spinach

    
    Saute onions, tomato, mushroom, garlic, and tomato paste

    Add sauteed vegetables to ricotta mixture

    If filling is left over make into a patty or two and bake next to the mushrooms.
    Please leave a comment. I love meeting other bloggers and I will visit your blog and follow your social media.


    Tuesday, February 14, 2012

    How to Sprout


    small mung sprouts
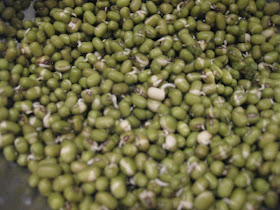
    Mung Beans starting to sprout Day 3


    Why Sprout?
    Sprouts are germinated seeds or legumes. The sprouting process makes the vitamin, protein, and enzyme content of the bean skyrocket!  If you want to boost your nutrition and your energy, try adding sprouts to your diet. It's one of the simplest ways to add real live food to your diet and fresh greens to your diet.

    How to sprout

    Years ago I had a spouting kit that was basically a jar with a mesh lid


    When we moved, the kit was lost
    misplaced so I started using a regular jar and then a colander and it worked.
    If you want to try to sprout, you can use any jar and follow these simple instructions.


    1.Place the mung bean ( or lentil) in a jar and cover with water. Soak overnight. 8-12 hours
    2. In the morning, pour off the water and either pour the mung beans into a colander and tip it sideways so no water accumulates or leave it in the jar, make sure it is drained well, tip on its side and leaning forward.
    3. Rinse a few times a day..and then tip on its side and again lean it forward.
    4. Do this for 3-4 days and you will have sprouts... After they sprout to the desired length refrigerate them


    Sprouts in my colander Day 1


    Mung Beans starting to sprout Day 3

    They needed another two days to really get going and get much bigger; never mind, they were really tasty small too.
    If you don't want to try the colander method you can buy a sprouting kit and follow their directions Or watch this video
    I looked on YouTube for a short, but good video with great instructions for sprouting. I found this one:
    http://www.youtube.com/watch?v=F-1V4vtV8Yo


      Add sprouts to salads.. Sprouted Mung Bean Salad Recipe


    Notice the little mung beans in this salad. They are sprouted and  packed with nutrition.

    Sprouting is a super easy way to add extra  protein , nutrition, enzymes, and antioxidants to your diet. Sprouts are very low in calories and low in carbs to boot!

    Sprouted Moong Salad

    Ingredients:
    1 cup of  of Sprouted Mung
    1 red onion, chopped
    2  large tomatoes, chopped2
    2  large cucumbers, chopped
    Fresh coriander leaves, chopped
    fresh mint , chopped ( optional)
    3 T Olive oil and juice of 1/2 Lime  , to taste

    Directions
    Mix the sprouts, onion,, tomato and cucumber in a bowl. 

    Season to taste olive oil and freshly squeezed lime juice. 

     Garnish with the chopped coriander leaves.

    You can also switch this salad up a bit by adding some plain unflavored natural yogurt, beaten well, to the salad veggies in the bowl in the first step mentioned above. Continue by seasoning and garnishing it.


    Please leave a comment so I know you stopped by. Scroll down to the end of the post and click on comments.
    See the little beans starting to open and sprout..


    Monday, February 13, 2012

    Sprouted Mung Salad


    Notice the little mung beans in this salad. They are sprouted and  packed with nutrition.

    Sprouting is a super easy way to add extra  protein , nutrition, enzymes, and antioxidants to your diet. Sprouts are very low in calories and low in carbs to boot!

    Why all the talk about sprouts today?

    My salad is full them~~

    Today, is reveal day for the Secret Recipe Club. It's an opportunity for me and you to meet other bloggers.
    My Secret Recipe Club assignment for February is from a delightful blog called  My Hobbie Lobbie authored by My PhotoTrisha Mumbai. She covers a variety of recipes for cooking and baking including some authentic Indian cuisine ( Yum) . Her recipes look great and there are quite a few of her recipes  that I still  want to try, ( like her recipe for Palak Paneer that is still calling my name..),   but the recipe that I selected to make for today's club is Trisha's "Sprouted Moong Salad."

    Being Vegetarians, we eat a huge salad every night, so I am always looking for something different.
    Aside from the usual romaine, tomato, cucumber, red onion, red cabbage etc. , I wanted something new! This was it..This salad is very different with the mung sprouts..

    Mung is a small bean that is dark green in color. It is sold in Indian food markets, Chinese food markets,health food stores, and on Amazon. It makes the typical bean sprout that you find in Chinese recipes.

    Sprouted Moong Salad

    Ingredients:
    A handful of Sprouted Mung ( See how to sprout the mung beans below)
    1 small onion, chopped ( I used red onion)
    1 tomato, chopped
    1 cucumber, chopped
    1 green chilly, finely chopped (optional)
    Fresh coriander leaves, chopped
    Salt, to taste
    Lime juice, to taste

    Directions
    Mix the sprouts, onion, chilly, tomato and cucumber in a bowl. 

    Season to taste with salt and lime juice. 

     Garnish with the chopped coriander leaves.

    You can also switch this salad up a bit by adding some plain unflavored natural yogurt, beaten well, to the salad veggies in the bowl in the first step mentioned above. Continue by seasoning and garnishing it.

    Again, refrigerate till ready to serve.

     
    See the little beans starting to open and sprout..


    Why Sprout?
    Sprouts are germinated seeds or legumes. The sprouting process makes the vitamin and enzyme content of the bean skyrocket! In addition, sprouts contain high amounts of digestive enzymes that help your digestion. If you want to boost your nutrition and your energy, try adding sprouts to your diet.

    How to sprout

    Years ago I had a spouting kit that was basically a jar with a mesh lid


    When we moved, the kit was lost
    misplaced so I started using a regular jar and then a colander and it worked.
    If you want to try to sprout, you can use any jar and follow these simple instructions.


    1.Place the mung bean ( or lentil) in a jar and cover with water. Soak overnight. 8-12 hours
    2. In the morning, pour off the water and either pour the mung beans into a colander and tip it sideways so no water accumulates or leave it in the jar, make sure it is drained well, tip on its side and leaning forward.
    3. Rinse a few times a day..and then tip on its side and again lean it forward.
    4. Do this for 3-4 days and you will have sprouts... After they sprout to the desired length refrigerate them


    Sprouts in my colander Day 1

    Mung Beans starting to sprout Day 3
    They needed another two days to really get going and get much bigger; never mind, they were really tasty small too.
    If you don't want to try the colander method you can buy a sprouting kit and follow their directions Or watch this video
    I looked on YouTube for a short, but good video with great instructions for sprouting. I found this one:
    Video:
        http://www.youtube.com/watch?v=F-1V4vtV8Yo


    The mung bean salad was fresh and delicious and different than our typical nightly salad. I could have used an additional day or two of sprouting for my sprouts to be a little larger ( It might have been because the weather has been really fridgid and we keep our heat low; those poor little beans probably would have liked it a little warmer)
    I was happy that this recipe reminded me about sprouting and how healthy it is to include this simple ingredient in your diet to boost the enzyme and nutritional value of a meal.

    As always, I enjoy taking my time searching through my assigned blog for the perfect recipe to make for reveal day. I am still without an oven, so the salad was a perfect choice.
    We enjoyed it.. and will make it again.

    Secret Recipe Club'
    Secret Recipe Club Hostess for Group B Suzanne of Thru Bugs on my Windshield
    Secret Recipe Club Founder  Amanda of Amanda's Cookin'
    Thank you so much to Suzanne and Amanda for all of their hard work organzing, fascilitating, and making possible the Secret Recipe Club.
    For information about joining, click on the icon..

    I've also just started visiting a delightful blog that you might enjoy..

     I just recently discovered a wonderful website that has a soup and salad linkys on Sundays. I'm going to submit this salad recipe, so pop over  and check out all the great soup and salad recipes.
    SouperSundays
    I love to hear from you. Please leave a comment so I know you stopped by. Scroll down to the end of the post and click on comments.

    Shared on :
    Tasty Tuesdays; Tempt My Tummy Tuesday ;  Made From Scratch Tuesday Delectable Tuesday ;  Show Me What You Got  ; Tip Me Tuesday at Tip Junkie  ; Tuesday To Do List; Tuesday Time Out Inspiration Party; ; Anti-Procrastination Tuesday Tuesday Confessional Tuesday Talent Show at Chef in Training ; Tutorial Tuesday ; Tuesday Time Out ; Domestically Divine Tuesday ; Take a Look Tuesday ; Terrific Under $10 Tuesdays ; Hearth and Soul Hop ; Frugal Tuesday Tip  Tuesday ;  Slightly Indulgent Tuesday Traditional Tuesdays,

    What’s For Dinner?; Works For Me Wednesday; Real Food Wednesday; Whatever Goes Wednesday; What’s On the Menu Wednesday; We Did It Wednesday;; Friendly Wednesday; Passionately Artistic; Show Off Your Stuff; What I Whipped up Wednesday This Chick Cooks; Your Whims Wednesday; Show and Tell Linking Party Wednesday; Wow Me Wednesdays; Wild Wednesday Hop; Show and Share; ; Success U-Wednesday Link-up   Foodie Wednesday      Living Well Wednesday  Ducks in a Row  Frugal Ways, Sustainable Days   Gluten Free Wednesda

    Recipe Swap ThursdayCreative Juice Thursday Full Plate Thursday; Cooking Thursday; Turning the Table Thursday; It’s A Keeper Thursday; What’s Cooking Thursday; Making It with Allie Thursdays; Frugal Follies Thursday; Simple Lives Thursday; Bake with Bizzy; Delightfully Inspiring Thursday Link Party; Share Your Awesomeness Thursdays; It’s a Blog Party; Vintage Recipe Thursday ; Haute Stuff Thursday ; Pennywise Platter Thursday, Full Plate Thursday  Simple Lives Thursday,  Thrilling Thursday, Thursday Ultimate Recipe Swap, Tastastic  Food and Health Carnival

    The Local Cook  
    Seasonal Celebration Sunday Savory Sundays; Every Day Sisters Sharing Sundays; Your Recipe, My Kitchen Seasonal Sundays at The TablescaperSunday Night Soup Night  Sunday School Blog Carnival



    Thursday, February 9, 2012

    Borscht- Russian Beet Soup


    borsht
    Our Valentine Cocktail to start off dinner
    Have you ever eaten borsht, a soup made from fresh beets?

    Although I make lots of fresh vegetables, cooking beets is a little intimidating to me.

    Beets are one of those vegetables that are super healthy for you, but a little ( alot) messy to cook.

    However, I recently learned that a friend uses rubber gloves when she makes beets. Duh! Why didn't I ever think of that..

    So, if you love beets, now is the time to make them.

    Both sets of my Russian grandparents thrived on Borscht ( cold beet soup), and my paternal grandmother lived to the ripe old age of one 107 ! Until her death, she was feisty, dignified, happy... Longevity was prevalent with my Russian ancestors and so was borscht ( is there a connection??)
    

                   Pin It            
             This is a picture of my relatives. ( 1940's  in Brooklyn, NY )


    My paternal grandmother made homemade winter borscht with beets, potatoes, cabbage, meat bones, and meat. It was served hot and was a hearty healthy meal for the cold nights in Russia.

    However, when she came to America, she started making  a vegetarian variety of borscht which she served ice cold and topped with a generous scoop of creamy sour cream ( I use thick Greek Yogurt)  When my paternal grandmother put the borscht and sour cream in the blender, it turned a beautiful hue of hot pink. It was a cooling meal on many a hot , humid, New Jersey night.

    Why Are beets so healthy?  Beets are powerful cleansers and help build the bloodBeets are a good source of vitamins and minerals and a very absorbable form of iron.
    This vegetarian gluten free borscht recipe contains not only beets but other healthy root vegetables as well. I like to use organic vegetables, which I think enrich the taste and reduce the pesticides.

    Personally, I never really developed a taste for borscht until I was an adult.
    However, I do love beets and will now occasionally make some summer borscht topped with creamy Greek yogurt. It's good in the winter too hot..
    I don't use the commercially produced jars of borscht because they contain lots of added sugar and the broth is really thin and sweet- almost like a drink.
    My homemade borscht can be delightfully tangy because I add a little lemon juice.

    I decided to make it in the crock pot. Eat it hot or cold- your choice.

    Judee Algazi @Gluten Free A-Z Blog
    Prep Time: 10 minutes
    Cook Time in the Slow Cooker:


    Ingredients

    1 large yellow onion, sliced
    Olive oil spray or 2 tablespoons olive oil
    3 large beets, peeled and quartered 
    3 small carrots, sliced
    8 cups of water
    2 large cloves garlic, peeled and chopped
    2 Tablespoons lemon juice
    2 Tablespoons coconut milk per bowl

    Directions:

    Turn slow cooker on high and add olive oil or spray with olive oil spray. Add chopped onion, carrots, and garlic and allow to saute for about 10 minutes, stirring as needed. Add beats and water and lemon juice . Cook on high for 3 and half hours. Remove from slow cooker, allow to come to room temperature and then chill in refrigerator. Eat borsht cold. Stir in 2 teaspoons of coconut milk in each bowl.

    vegetables, beets, carrots, onions

    borsht, beets, crock pot
    Cook in the crock pot on high  for 3 and 1/2 hours or in a pot for 2 hours

    borsht, blender, soup
    Blend with or without Greek Yogurt

    borsht, soup, glass of soup
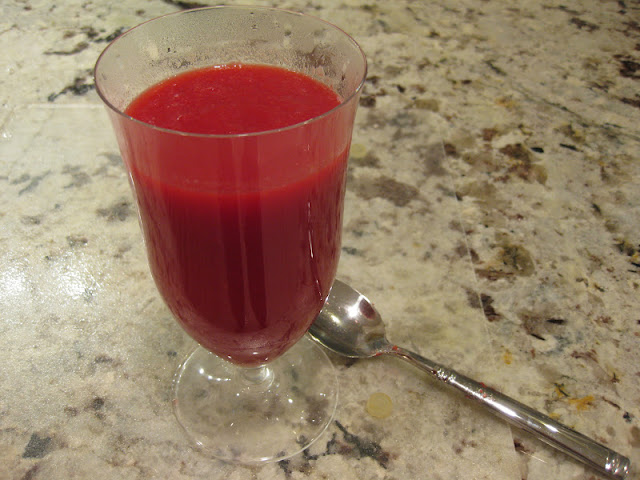
    My grandparents drank their borscht from a glass..

       Pin It
       I love to read your comments. Please leave a comment so I know you stopped by. Scroll down to the end of the post and click on comments.

    Chocolate covered strawberries


    I just recently discovered a website that has a soup linkys on Sunday. I'm going to submit this soup recipe, so pop over on Sunday and check out all the great soup recipes.

    SouperSundays